Showing posts with label bread. Show all posts

Thursday, March 12, 2015

Breadmaker butter and milk oat loaf (Baking with little one)


Now that the little fella is about 2 years + we do a lot of stuffs together. Everyday at 5pm, I'd try to leave my shop earlier so we can have more time for some playtime or activities before we depart for our in-law's for dinner. Yesterday, we did a lot, other than the activities for Josh's tot school, we baked a very aromatic butter and milk loaf. This is the age that they want to be involved helping us with all kind of tasks, and cooking or baking is one of them. I felt that when he's involved in making the food, he eats more of them. This loaf took about 3 hours to bake, so it was already bed time by the time it was done. He was only able to see and taste it the next day and he loved it, he was picking out the pistachio to munch on. 

Baking this was quite simple, as it is a straight dough recipe which requires no advanced preparation of a starter dough or what not. All I needed to do was to weigh the ingredients and to put them into the breadmaker pan according to its order. The little fella helped me out in doing some parts of the ingredients input. He loved it and was checking out the dough with me when the breadmaker was doing the kneading. The loaf was made using my trusty Donlim breadmaker. 

Ingredients (placed into the breadmaker according to the following order): 
  • 80g whipping cream 
  • 150g cold milk 
  • 2tbsp rolled oat, organic 
  • 3tbsp brown sugar 
  • 1/2 tsp salt
  • 270g high protein flour (bread flour)
  • 30g all purpose flour 
  • 3/4 tbsp instant active dry yeast 

  • 30g butter, chopped into small little cubes (to be added in later, see instructions No. 5) 
  • 3tbsp pistachio (added in later, see instructions No. 6) 
Instructions

  1. Remove the breadpan from the breadmaker. Make sure the kneading blade is fitted in. 
  2. Add all the ingredients, except butter (in the order listed above) into the breadpan. 
  3. Insert and lock the breadpan into the breadmaker. 
  4. Select mode no. 1 (basic bread mode 标准面包),select WEIGHT重量as 900g, select CRUST INTENSITY烧色as LIGHT浅 and press START启动。
  5. The kneading blade will start to rotate to combine the ingredients to form a dough. About 5min after  kneading starts, lift up the lid, add in chopped butter and let breadmaker continues to knead. 
  6. Optional, I have also added in some pistachios, they were added in at about 20th minute.  


Saturday, September 6, 2014

Cornflakes crusted french toast


I have been so lazy lately. Haven't been making proper breakfasts for the little fella. We just have the simple and easy overnight oat. It's seriously the most fuss-free breakfast ever. Felt a little guilty about it when I saw mommies in the Healthy Food For My Baby group on FB making nice breakfasts for their little ones, and I came across a mom who shared about this, cornflakes crusted french toast, thought I should make it for my lil' fella. He loves cornflakes, he should love this. How wrong am I. It turned out that he wasn't big fan of the french toasts. He picked up the cornflakes from the toast and ate them. Meh... 

Anyway, I'm still sharing about it, cos I loved it myself. One tip, serve it and eat it when freshly made. The cornflakes weren't as crispy after left out for some time. 

Here's how you make it. It's pretty much like making the normal french toast, with an added step of dipping the egg-soaked-bread in crushed cornflakes.


  • Few slices of bread 
  • 2 eggs 
  • 2 tablespoon of sugar
  • 2 tablespoon of milk
  • 1/4 teaspoon of cinnamon
  • Pinch of salt 
  • Knob of butter for pan 
  • 2-3 cups of cornflakes

Instructions
  1. Crush the cornflakes in a ziplock or sandwich bag. 
  2. Beat together eggs, sugar, milk, cinnamon and salt. 
  3. Heat up a pan, add a knob of butter, swirl around the pan until it melts. 
  4. Dip both side of bread into the egg mixture, coat thoroughly with the crushed cornflakes mixture. Press lightly so the cornflakes stick. 
  5. Place the crusted french toast on the pan until it cooks to golden brown on one side and repeat with the other side. 
  6. Serve immediately. 
 

Tuesday, August 12, 2014

Japanese milk tea bun with raisin & cinnamon sugar


Here's a very beautiful yet soft and fluffy Japanese milk tea bun with very generous amount of raisin. I replaced the liquid in this recipe with Japanese milk tea (as in photo). I have also replaced the sugar in this recipe with cinnamon sugar (made up with 1:1 ratio of brown sugar and cinnamon powder). The bun turns out smelling very fragrant and soft. A friend of mine A whom had this wasn't sure if her son would like it due to the alien spice (ie cinnamon) in it, the next morning she called me up and told me that her son loved it! Made my day :) 

Take more cinnamon. It's great. Cinnamon may help lowers risk for diabetes. It also helps fight against fungal and bacterial infection. Some researchers had also done research which revealed that diets rich in cinnamon can help reduce the body's negative responses to eating high-fat meals (Source). 

Here's the recipe 

Prepare scalded dough
  • 100g bread flour (Hi protein flour) 
  • 70g hot water 
Combine both in a bowl. Stir with a chopstick or folk to ensure both combine thoroughly. Cover and keep in fridge for about 15-25min. 

Prepare the main dough (I kneaded this in my breadmaker) 
  • 3tbsp rice bran oil 
  • 250g Japanese milk tea (made up with one sachet) 
  • 2tbsp cinnamon sugar (made up with 1tbsp brown sugar and 1tbsp of cinnamon powder) 
  • pinch of salt 
  • 300g bread flour (Hi protein flour) 
  • 100g all purpose flour (plain flour) 
  • 1tsp instant active dry yeast 
4tbsp raisins, chopped
2tbsp butter, melted with 1tsp cinnamon powder and 1tbsp brown sugar  
  1. Add all the ingredients (in the order listed above) in bread pan, except for scalded dough and raisins and butter. 
  2. Select mode for dough 发面。 The display panel will display defaulted time of 1hr30min. Press start. 
  3. When the ingredients have combined together (about 3min) add in the scalded dough by pieces. 
  4. After 1hr30min, the breadmaker will beep to indicate that the dough is ready. 
  5. Remove the dough from the breadmaker. 
  6. On a floured surface, punch the dough to remove trapped air. Knead and throw a few times. Divide into 6 equal portions weighing about 130-150g each. 
  7. With a rolling pin, flatten the portioned dough into a flat oval disk. Spread 1tsp of butter-cinnamon spread on the disk. Sprinkle with chopped raisins. Cut the flat disk into 4-5 strips but leaving one end intact (not cut). Roll up the entire strip disk to form a long twig. Twist one end, 3-4 times, and form the twisted twig into coil. Place the bun on a baking tray. Repeat with the remaining portioned dough. See my facebook link for a short video clip on this step. https://www.facebook.com/photo.php?v=10154491536890352&set=vb.577660351&type=2&theater&notif_t=like 
  8. Brush top of bun with water. Sprinkle with more cinnamon sugar. Let rise until the bun double their original size (takes about 30-45min). 
  9. Preheat the oven to 170deg C. Bake the buns for about 18-20min. 


The last 2 steps are re-illustrated using table cloth in the following diagram. 


This post is linked to the event Little Thumbs Up (August 2014 Event: Flour) - organised by Zoe (Bake for Happy Kids) and Mui Mui (My Little Favourite DIY) and hosted by Diana from Domestic Goddess Wannabe.


Tuesday, June 24, 2014

Wholemeal croissant


This is gonna be a busy week for me. I have some friends with babies visiting from KL. I’ll be bringing them around Sandakan, checking out the orang utans, proboscis monkey (my son would love seeing them, he calls them ma-rao), crocodile and bears. Lucky that we have quite a lot of these in Sandakan. I’m sure both my son and I will have an excited week ahead.

The gang will be arriving late afternoon today and tomorrow. Thinking of making something for their tea later on today. Should I make them some nice, buttery, flaky croissants? But I haven’t made them for years. And the last attempt didn’t turn out perfect. Or should I just make them some of my usual cupcakes or buns? Me, knowing myself, I would definitely challenge myself in making the croissants. Who am I, if I’m not up for a simple challenge?


Tada!! The wholemeal croissants turned out ‘perfect’ .. or not so. I rated them 7 out of 10. They still don’t look that ‘perfectly’ pretty. But since they are ‘home-made’, I’m sure I’ll be pardoned. Taste and texture wise, GREAT!! Lovely buttery aroma lingers on even hours after they are baked. The thing I love about this recipe, it’s not that tedious compared to the usual croissant recipe, yet still turn out tasting awesome (it only took me about 3hours from start till finish)! That’s why I’ve been trying out quite a lot of recipe from Vic’s blog. So far, most of the recipes I’ve tried out from her blog turned out good. I’ve made some modifications to mine by replacing some of the plain white bread flour with wholemeal flour, so I don’t feel that gush of guilt eating these buttery morsels. Instead of pastry margarine as recommended by the recipe, I still insist that I use real butter. If you’ve been following me or my blog, you know that I’ve banned all sorts of trans-fat ingredients or food. But I knew that croissants with butter would be much harder to work with if compared to that using pastry margarine, due to the weather here. I would just have to give my best.

They said no one make perfect croissant on their first attempt. It needs lots of practice, patience and dedication. I’m only afraid that by the time I get there making the best croissant ever, my waistline would get super out-of-shape. Anyway, no one talks about ‘waistline’ when comes to good food. My favorite quirky filling for my wholemeal croissant is peanut butter and sliced banana (.. don’t give me that rolling eyes). What’s yours?

Recipe adapted from Victoria Bakes, further adapted from Alex Goh’s The World of Bread

  • 45g butter, softened (I used grapeseed oil)
  • 180ml cold water
  • 1tbsp soy milk powder
  • 1tsp salt
  • 2tbsp brown sugar
  • 150g bread flour
  • 60g wholemeal flour
  • 90g all purpose flour
  • 2tsp instant active dry yeast

  • 120g unsalted butter, left in freezer for 30min

Instructions
    1. Grate frozen butter with a cheese grater onto a piece of cling film and form into a square block, measuring about 15cmx15cm. Chill in refrigerator.
    2. Prepare dough by kneading all ingredients. I kneaded the dough using my Donlim breadmaker for 20minutes. All the ingredients are added in based on the order they are listed above.
    3. Roll dough out into a square, measuring about 30cmx30cm, wrap with cling film, and chill for 1 hour.
    4. Remove dough and butter block from frige. Place butter block in the middle of dough, and pull 4 corners of dough together to wrap the butter in the middle, seal the seams.
    5. Gently flatten the dough with my palm, using the rolling pin, roll dough out into a long rectangle till it is 1cm in thickness. Fold out in thirds like an envelope, turn dough 90 degree, and repeat the same process once more.
    6. Wrap dough with cling film and chill for 30 minutes.
    7. Remove chilled dough. Dust the tabletop with bread flour. Repeat the above process (Step 5) once more and chill dough for another 30 minutes.
    8. Remove dough from fridge, and roll it out to 5mm thickness (mine was about 10mm thickness, I couldn’t roll it any thinner or the butter would be oozing out), cut triangles (with base width measuring about 5cm and length measuring about 5-7cm), roll and shape into croissant.
    9. Prove croissants in oven for an hour.
    10. 15 minutes before the hour, remove croissants from the oven. Preheat oven to 170degC (for my Khind oven), brush with egg wash and sprinkle with topping (optional).
    11. Bake for about 18-20 minutes or until croissants turn golden brown.

*I made 13 croissants using this recipe


Saturday, June 7, 2014

Cinnamon and raisin roll


It's public holiday today! It's the birthday of our Yang di-Pertuan Agong. When I told my hubby who works half day on Saturday that it's public holiday today, he was nowhere near excited. Instead, he answered, 'what's so special about a public holiday that falls on Saturday?, nowadays, public hols meant holiday for the nanny (yea.. our nanny gets it off every public holiday) but 'work' day for me!' Hahahaaaa!! So true indeed.  That's because I don't get a day off cos I operate an organic shop and we don't close on minor holiday like this. So the hubby got to stay home and takes care of an actively roaming and actively 'speaking' toddler at home :p Deep at heart, I felt glad and lucky that I have a hands on hubby who does that :)
 
Now here's a cinnamon and raisin roll that I made yesterday for the little fella's snack today. I kneaded the dough using my faithful breadmaker.

First, prepare the scalded dough
  • 100g wholemeal flour or plain bread flour 
  • 70g hot water
 
Combine both with a folk or spoon. There is no need to knead. Just combine and leave in a container in refrigerator while you prepare the rest of the ingredients (about 15-20min). You can prepare this ahead and keep in the fridge for up to 24hours. Add into the main dough when the main dough has kneaded for about 5min in the breadmaker (see step 2 below).
 
The main dough
*The ingredients are listed in the order they are added into my breadmaker
 
  • 50g (about 4tbsp) rice bran oil
  • 250g almond milk (made from almond milk powder)
  • 4tbsp brown sugar
  • pinch of salt   
  • 300g high protein flour
  • 100g all purpose flour
  • 3/4tsp baker's yeast (instant active dry)

The following ingredients are used later on, see step 5 below.
  • 3tbsp toasted, walnut and pumpkin seeds (optional)
  • 4tbsp chopped sultana raisins
  • 2tbsp brown sugar mixed with 2tbsp cinnamon powder
  • Egg wash (made by beating one egg with 2tbsp milk)
 
After final proof, ready to go into the oven.
 
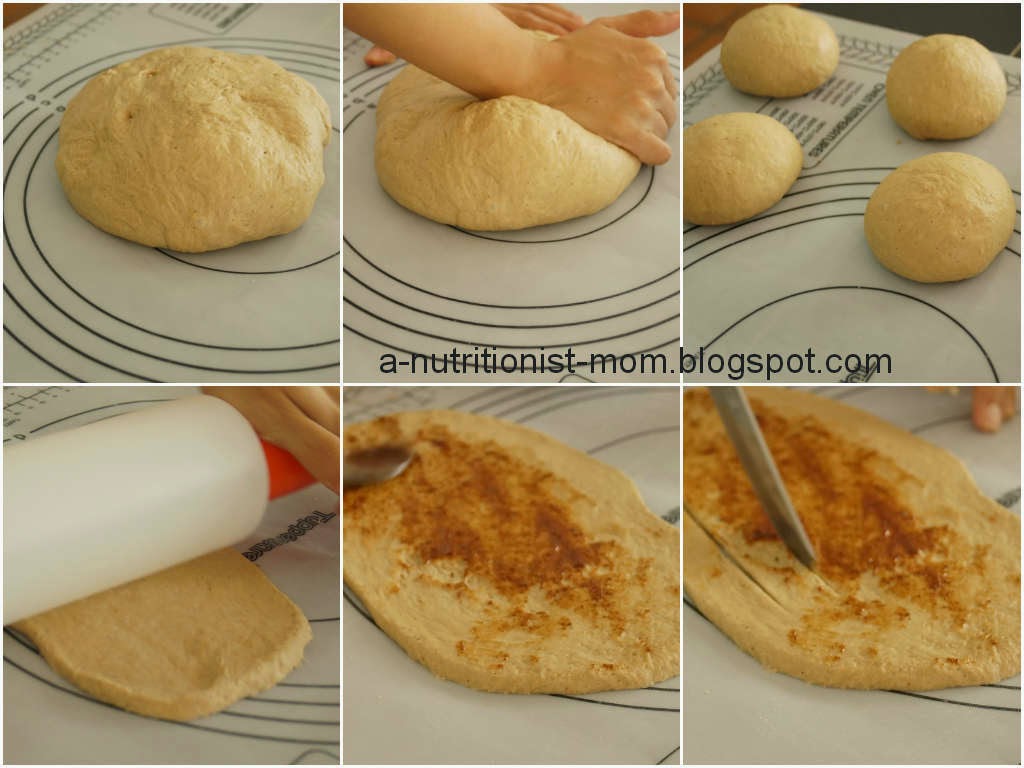
  1. I have kneaded the dough using the 'DOUGH' mode with my breadmaker.
  2. When all the ingredients has combined together, I add the scalded dough in pieces.
  3. The breadmaker would finish kneading and go through a proving phase (about an hour).
  4. Once it finishes its DOUGH mode, remove the dough from the breadmaker and punch it to remove trapped air.
  5. Using a rolling pin, roll the dough to a flat rectangular shape (measuring about 1cm thickness). Sprinkle with cinnamon brown sugar mix generously over the rectangle dough. Then sprinkle with the raisins, chopped pumpkin seeds and walnuts. Then roll the dough like swiss roll (see photo above) and slice to about 12-15 pieces. Place the sliced roll on a greased baking tray.
  6. Brush the top with egg wash and sprinkle with brown sugar (optional).
  7. Let the dough proof for another 45min or until the dough doubles its original size. **I have always done this second proof in an oven (without turning it on).
  8. Preheat the oven to 165degC, bake for about 20min.   

Wednesday, May 21, 2014

Rye bread with black sesame and dried apricot

Want to maintain your slender figure but you love bread? Try rye bread instead. Rye fiber is richly endowed with noncellulose polysaccharides, which have exceptionally high water-binding capacity and quickly give a feeling a fullness and satiety, making rye bread a real help for anyone trying to lose weight.
 
I've been baking with rye a lot lately. Rye is a cereal grain that looks like wheat. It is generally available in its whole  or as flour or flakes that look similar to old-fashioned oats. Because it is difficult to separate the germ and bran from the endosperm of rye, rye flour usually retains a large quantity of nutrients, in contrast to refined wheat flour. Rye has a handful of benefits that cannot be compared by those made with white flour or even wholemeal flour, here are some listed by whfoods.com:
 
  • Promotes weight loss
  • Prevents gallstones
  • Substantially lowers type-2 diabetes risk
  • Promotes gastrointestinal health
  • Significant cardiovascular benefits with postmenopausal women
The list actually goes on.
 
So now you know why I've insisted to add in rye flour to my baking lately.
 
Using the soft and fluffy recipe that I've always been baking bread with, it doesn't affect the texture to a great extent. It's still soft and I love seeing the little rye grains that appear on the bread. Looks very rustic and healthy indeed.


I have always baked my bread using an adapted and modified scalded dough method by Alex Goh which yield very soft and fluffy bread without adding any softener. It is easy and straight forward. You'll just need to scald 100g of bread flour with 70g of hot water, simply mix it with a spoon or folk, cover up, leave in chiller while you prepare the rest of the ingredients. When all the other ingredients are well combined and kneaded, add in the pre-prepared scalded flour and knead till evenly combined. The results are very worth the extra step taken. I have tried all sorts of method that claims to yield soft fluffy bread. This method, too, can produce bread with the same kind of fluffiness.
 
Here's the recipe for my rye bread with black sesame and dried apricot
 
First, prepare the scalded dough
  • 100g rye flour
  • 70g hot water
Combine both with a folk or spoon. There is no need to knead. Just combine and leave in a container in refrigerator while you prepare the rest of the ingredients (about 15-20min). You can prepare this ahead and keep in the fridge for up to 24hours.
 
The main dough
*The ingredients are listed in the order they are added into my breadmaker
 
  • 40g (about 3tbsp) rice bran oil
  • 250g water
  • 2tbsp brown sugar
  • pinch of salt
  • 3tbsp black sesame powder
  • 300g high protein flour
  • 100g all purpose flour
  • 1tsp baker's yeast (instant active dry)
  • 5 dried black apricots, chopped (added in after 25min of kneading time in the breadmaker)

  1. I have kneaded the dough using the 'DOUGH' mode with my breadmaker.
  2. When all the ingredients has combined together, I add the scalded dough in pieces.
  3. After about 25min of kneading, I add in the chopped dried apricot.
  4. The breadmaker would finish kneading and go through a proving phase (about an hour).
  5. Once it finishes its DOUGH mode, remove the dough from the breadmaker and punch it to remove trapped air.
  6. To make loaf, divide the dough into 3 equal portions, roll into swiss roll form and place in loaf pan. Let the dough proof for another 45min or until the dough doubles its original size. Alternatively, you may also make buns by dividing the dough into 5-6 equal portions. Similar, the bun dough needs to be proven for another 45min. **I have always done this second proof in an oven (without turning it on).
  7. Brush top of loaf or buns with water and sprinkle with black and white sesame seeds.
  8. Once the loaf or buns are ready to be baked, preheat the oven to 165deg C, bake for about 20min (for buns) or about 45min for loaf.
 

Saturday, April 19, 2014

Spinach loaf with black eyed bean


I dunno why, but everytime I make spinach loaf, it always turn out very very soft and fluffy. Of course, I know a lot of it is because of the scalded dough method, but somehow I felt that the spinach version is sooo much fluffier. This spinach loaf is quite similar to the one I previously made, with the exception that this recipe makes a bigger loaf (to fit in my newly bought loaf tin, measuring 20cm x 10.5cm x 11cm) and it makes use of spinach and black eyed bean sauce and the loaf has cooked black eyed beans in it for extra bites.
 
Here's the recipe, adapted from Alex Goh's scalded dough method
 
Scalded dough
  • 100g bread flour
  • 70g boiling water

 Pour hot boiling water over bread flour. Mix to combine. Leave cool for 30min in fridge.

Main dough
*The ingredients were added into the breadmaker pan in the following order
  • 100g spinach and black eyed beans sauce, refer here for the recipe
  • 150g water (normal room temperature)
  • 45g grapeseed oil
  • 2tbsp molasses sugar
  • pinch of salt
  • 150g bread flour
  • 150g wholemeal bread flour
  • 100g all purpose flour
  • make a well in middle of flour, and place in 1tsp. active dry yeast


Instructions:
  1. I kneaded the dough using my Donlim breadmaker.
  2. Select the “dough” mode. When all ingredients come together (about 3-5min in my case), add the scalded dough prepared ahead in little pieces.
  3. Let the dough complete the 1st round of proofing, until doubled in size, about 45min to an hour.
  4. Transfer the dough to a clean floured surface. Deflate and divide into 3 equal portions (about 270g each). Knead into ball shapes. Cover with plastic wrap, let rest for 15 minutes at room temperature.
  5. Roll out each dough ball with a rolling pin into an oval shape. Sprinkle cooked black eyed beans. Roll up the dough and seal tightly. Roll out each portion with a rolling pin. Seal faces upward and roll into a cylinder shape (or swiss roll look-alike). Arrange the rolled-up dough in a greased or non-stick loaf tin. Repeat this step for the other two portions. Leave it for the 2nd round of proofing, about 45 minutes, or until the dough rises up to 4/5 of the height of the tin inside.
  6. Bake in a pre-heated 170C oven* (in my case, I baked at 160deg C in my khind toaster oven) for 35 minutes. Remove the loaf from the oven and tin. Transfer onto a wire rack and let cool completely.
     

Thursday, April 17, 2014

Black sesame loaf (Overnight sponge dough method)

I have always been baking with my favorite soft and fluffy bread recipe, which is the scalded dough recipe. But I recently bought a huge loaf tin, measuring 30cm x 10.5cm x 11cm, and my usual scalded dough recipe would not fill this huge loaf tin, and I can't be bothered to do the conversion of the ingredients, so I just simply google for a good one, and I found this, and it IS a good one.
 
A friend once shared with me, out of all these different starter dough method, ie tangzhong, overnight sponge dough, or scalded dough method, her favorite is the overnight sponge dough 中种method. I have tried the 17hr method before, but I wanted to try them more to verify if it's the best. Verdict: I'm not entirely sure if it's the best among the rest, cos I'm quite sure I have achieved the same fluffiness using scalded dough method before. But it's another easy and quite a convenient one. You can prepare the overnight sponge dough the night before and finish up the loaf the next morning.
 
I made extra for sale. So maybe I can check with my client if they can observe any difference with the bread texture. All this while, my client has been buying the bread I baked with scalded dough method.


Here's the recipe:

Overnight sponge dough
  • 470g high protein flour (bread flour)
  • 66g egg
  • 269g water (I used milk)
  • 4g / 1tsp instant active yeast
  • 2tbsp toasted black sesame (I added this)
Main dough
  • 40g high protein flour (bread flour)
  • 2tbsp brown sugar
  • pinch of salt
  • 35g butter (I replaced this with 2tbsp rice bran oil)
  • 1g instant active yeast
Instructions:
  1. Combine all the ingredients for the overnight sponge dough, knead into a dough, keep in a closed-container in refrigerator and let proof for 24hrs (or until the dough has tripled its original size). (I have only proved it for about 12hrs).
  2. In my Donlim breadmaker, I knead all the ingredients in the main dough with the overnight sponge dough (torn into small pieces) for about 10min, until the dough can be stretched into a nice thin membrane without tearing (see photo below).
  3. Membrane test:
  4. Divide the dough into 3 equal portion, set aside (let relax) for about 30min.
  5. Punch out the gas into the divided portion. With a rolling pin, roll into a long disk. Roll up and place in the loaf tin. Repeat the same with the other two portions.
  6. Proof until the dough fills to about 90% of the tin.
  7. With my Khind oven, I've baked this at 155deg C for about 35min.
I have also baked other bread loaves and buns with this recipe:
  • Carrot and goji loaf (replaced 269g water with 120g steamed carrot and goji puree and 170g water, also omit the egg, and replaced with 65g water)
  • Apricot and raisin bun (added 1tbsp raisin and 1tbsp chopped apricot into the dough, omitted the egg and replaced with 65g water)


Golden butter loaf 老式面包

This is a very famous soft and fluffy bread recipe that's popular among the Chinese bloggers. I don't know how to translate its name into English, 老式面包  is literally translated as 'the olden style bread'.  It takes a long time but the results are worth it. If you read Chinese and would like to hear stories about this recipe, see here.
 
I have not changed or adapted this recipe, so I'm not gonna repeat or copy the recipe here. Refer to the link above for the recipe. If you're looking for something nice, soft and buttery, try it. It takes about 5hrs, inclusive of the sponge dough stage, but it's worth a try. Bernice whom I follow has also done the same bread, which you may also refer for easier reference.
 
The entire loaf was kneaded and baked in my Donlim breadmaker.
 
Can you see how soft it is?
 

Tuesday, April 8, 2014

Purple loaf 紫米土司


I am addicted to creating marble effects lately, been doing it in chiffons and my bread loaves. This time I have done it with purple rice 紫米。 This purple rice loaf is quite commonly seen among the Chinese blogosphere. I love the color it renders, thus I made double portion of the dough (half white and half purple), halved it to be baked into a loaf, and the other half was made into two bread rolls. 
 
I have this really nice organic purple rice which I've always been adding into my red bean dessert. It helps to create creamy red bean soup dessert. According to its packaging, purple rice is very rare and thus have always been highly prized. When cooked, it has a wonderful fragrant. It is rich in calcium, iron, protein, vitamin B1, B2, B17 and 17 types of amino acids and other nutrients. These nutrients help to boost up blood circulation and replenish iron needs, especially for pregnant ladies and kids  (紫米因产量稀少,历代帝王,都把它视为贡品。 煮熟的紫米,香味极佳,含丰富的钙、铁、蛋白质、维他命B1, B2 及17 种氨基酸等人体所需的多种微量元素,有助促进血液循环,有助于改善孕妇、儿童缺铁性状况。) 。。。 Reading this, I think this will be my favorite loaf from now on :D
 
I have used my favorite soft and fluffy loaf recipe, but replaced the red bean with cooked purple rice. Purple rice cooks quite easily, it only took about 20-30min in a normal pan of boiling water. I have also added about 2tbsp of cooked purple rice into my breakfast oatmeal.

Cooked purple rice has this pretty glossy-look.


Sunday, March 30, 2014

Black sesame bun with sunflower seeds

I found the perfect bread for my organic peanut butter!! It's this black sesame bread! The nice nuttiness from this black sesame bun topped with sunflower seeds seems to be the perfect bread that matches nicely with my creamy organic peanut butter. I actually mix together the peanut butter with white tahini so I get lots of the omega goodness while I indulge in something that tastes so good!
 
This black sesame bread recipe is a recipe I worked out by accident. I was supposed to use my normal soy milk bun recipe for this, but my weighing scale was dirty and I had no time to wash it before I could weigh out my liquid ingredients, so I just put in one cup of the black sesame cereal milk into this recipe and the bun turned out 'oh! so fluffy!'. This dough was kneaded using my breadmaker. Its hydration level is very high. First, I'm not sure if it works kneading by hand, I have a feeling it's gonna be very messy (or sticky), and secondly, I'm not sure if it works on other breadmaker. Try it at your own risk, but the results are worth it.


Instead of using black sesame powder (which you can obtain simply by grinding toasted black sesame seeds), I used a sachet black sesame cereal drink powder (see photo below). I made up the black sesame drink with a cup of warm water and chilled it slightly before using it in this recipe. This drink is made up of black soya, black sesame, black rice, walnut, blackcurrants, pine nuts, black mu-er 黑木耳 and 何首乌。 I felt that drinking this drink is better than drinking black sesame alone, cos there are a multitude of other antioxidants and nutrients available from other iron-rich grains, seeds and nuts. Black soya, black mu-er and 何首乌 are also great for hair health. I have also used it to bake my favorite chiffon cupcakes recipe for my MIL's birthday.


Here's the recipe adapted from Alex Goh's scalded dough method

Scalded dough/ starter dough
·         100g bread flour
·         70g boiling water

To prepare the starter dough, pour boiling hot water over flour and stir with folk until combined into a slightly tacky dough. Cover and chill in the refrigerator. Chill for 20min before use, can keep up to 12hours in refrigerator.

Main dough
  • 2tbsp grapeseed oil
  • 1cup of black sesame cereal drink (made with 1 sachet in 1 cup of warm water), chilled before use
  • 2.5tbsp brown sugar or dark muscovado sugar
  • 1/2 tsp salt
  • 200g bread flour (hi protein flour)
  • 50g all purpose flour
  • 3/4 tsp instant active dry yeast

* about 2-3 tbsp. raw, untoasted, organic sunflower seeds.
 

1.       Remove the breadpan from the bread machine. Fit in the kneading blade.
2.       Add all the ingredients in the order listed above, except for the scalded dough prepared earlier.
3.       Insert and lock the breadpan into the bread machine.
4.       Select mode no. 7 (dough)* the display panel will display defaulted time of 01:30 (1hr30min). Press start.
5.       When all the ingredients has combined together (about 5min), add in the starter dough in small pieces.  
6.       After 1 hour 30min, a beep alert will sound indicating that the dough is ready.
7.       Remove the dough from the bread maker.
8.       On a floured surface, punch the dough a few times to remove trapped air. Knead and throw a few times. Let rest for about 5min, then form about 150-200g portion of dough into ball shape. (Cover your palms with vegetable oil if you find the dough is too sticky to knead or shape)
9.   Repeat with the rest of the ball.
10.   Brush the top of buns with beaten egg wash and sprinkle generously with sunflower seeds.
11.   Cover buns with damp cloth or cling film (or in the oven) and proof for the second time for about 45min, or until double in size.
12.   Preheat the oven to 175deg C. Bake the buns for about 15-20min.


Soy pandan bread roll with black raisins


If only you can smell by looking at this photo, you'll know how good this is. (blush)
 
I prepared some really soft and fragrant pandan hee pan, and I reserved the pandan soymilk I made for this bread roll.
 
I prepared pandan soymilk by pureeing about 5 pieces of pandan leaves with 1 cup of fresh unsweetened soymilk. My blender can blend the leaves till really smooth fiber-free, so I didn't even sieve the mixture. Even though pandan leaves are mostly used for fragrance where we are, they are actually quite a nutritious and antioxidant-rich plant. Screwpine foliage is rich in antioxidant  flavonoids and, as a result, is thought to have anti-cancer properties. This benefit is attained by consuming the leaves in rice, soup, as a wrap, or in desserts. The foliage is used as an arthritic pain reliever and an antiseptic for healing wounds and skin disorders, including leprosy and acne. Diabetics and those that suffer from ulcers may also find it to be beneficial. Read more about this here.
 
Some of the homemade buns and bread rolls I made are sold at my shop, Just Health. Most of the clients who buy from me regularly are those who are aware of the 'stuffs' that are added into commercial bread, making them 'mortal' or without lifespan. Some of them buy for their little ones, cos I don't use softeners, improvers, shortenings or eggs in my bread. There are also some who are cancer sufferers. This pandan bread roll with real pandan leaves, all inside them, would be great for them, cos pandan are known for its anti-cancer properties.
 
This is my usual soymilk bun recipe, using Alex Goh's scalded dough method, and is kneaded using my faithful Donlim breadmaker.
 
Scalded dough/ starter dough
·         100g bread flour
·         70g boiling water
To prepare the starter dough, pour boiling hot water over flour and stir with folk until combined into a slightly tacky dough. Cover and chill in the refrigerator. Chill for 20min before use, can keep up to 12hours in refrigerator.
Main dough
 
·         3tbsp vegetable oil (I use grapeseed oil)
·         150g soy pandan milk  
·         2tbsp brown sugar
·         ½ tbsp salt      
·         200g bread flour
·         50g all purpose flour
·         ¾ tsp instant active dry yeast 

*half a cup of raisins, soaked in warm water for 5min
1.       Remove the breadpan from the bread machine. Fit in the kneading blade.
2.       Add all the ingredients in the order listed above, except for the scalded dough prepared earlier.
3.       Insert and lock the breadpan into the bread machine.
4.       Select mode no. 7 (dough)* the display panel will display defaulted time of 01:30 (1hr30min). Press start.
5.       When all the ingredients has combined together (about 5min), add in the starter dough in small pieces.
6.       After 1 hour 30min, a beep alert will sound indicating that the dough is ready.
7.       Remove the dough from the bread maker.
8.       On a floured surface, punch the dough a few times to remove trapped air. Knead and throw a few times. Let rest for about 5min, then form about 200g portion of dough into ball shape.
9.       Flatten dough into a oblong disk, sprinkle generously with soaked raisins. Roll up. Repeat with the rest of the dough.
10.   Brush the top with beaten egg wash and sprinkle with white sesame seeds.
11.   Cover bread rolls with damp cloth or cling film (or in the oven) and proof for the second time for about 45min, or until double in size.
12.   Preheat the oven to 175deg C. Bake the bread rolls for about 20min.


Related Posts Plugin for WordPress, Blogger...