Showing posts with label event. Show all posts

Saturday, August 9, 2014

Orange & mango chiffon cake

Somehow, today didn't feel like a Saturday. Time seems to fly by so quickly these days. I had a class at Just Health today to teach the new Donlim breadmaker clients on their new machines. After the class, I went home and baked my favorite 'tang mian' (scalded dough) chiffon cake so that mom can try it. Mom loved it. The lil' fella loved it too.


This is adapted from a chiffon cake recipe that I tried out sometime back, but this round, I turned it into a 'cooked dough' (tang mian) version. It turned out fantasticly soft, in fact, a little on the moist side. I actually love my chiffon to be a little moist, it seems to give that 'melt-in-your-mouth' sensation.

Here's the recipe, adapted from Happy Home Baker. 

Ingredients:(I used an 18cm chiffon pan)

4 egg yolks (medium)
2.5tbsp dark muscovado sugar
3tbsp rice bran oil
90g freshly squeezed orange juice
80g cake flour (I actually used 65g all purpose flour and 15g corn flour)

4 egg whites (medium)
3tbsp dark muscovado sugar

60g chopped mango


Instructions:
  1. Sieve cake flour and set aside. 
  2. Combine rice bran oil with freshly squeezed orange juice. Heat up to simmering in a pan. Remove from heat. Add in sifted flour. Add into egg yolk mix. Whisk to combine.
  3. In a clean, dry mixing bowl, beat egg whites with a handheld electric mixer on low speed until mixture becomes frothy and foamy.  Add half of the sugar amount and turn to high speed and beat the mixture. Continue to add in the remaining sugar and beat until the egg whites reaches the soft peak stage.The soft peak stage is reached when the peaks of the whites curl over and droop slightly. The egg whites should appear smooth and glossy, and if you overturn the bowl, the egg white meringue doesn't drop.
  4. Add the beaten egg whites into the egg yolk batter in 3 separate additions, each time folding gently with a spatula until just blended.
  5. Add in the chopped mango.  
  6. Pour batter into a 18cm tube pan (do not grease the pan). Tap the pan lightly on a table top to get rid of any trapped air bubbles in the batter.
  7. Bake in pre-heated oven at 140 degC for 40 mins (every oven differs, my oven has been a very friendly one, after about 20min in the oven, I had to tent an alum foil loosely oven the chiffon to avoid the top from getting too brown), bake until a toothpick inserted into the centre comes out clean, when lightly pressed the cake will spring back. Invert the pan immediately and let cool completely before unmould (I usually wait for at least an hour before I unmould the cake from the pan).  


Yep, this is me letting my clients know why it is now more important to bake our own bread rather than buying from outside.


For enquiry related to the breadmaker that I sell at Just Health, please email justhealthsandakan@gmail.com


Tuesday, October 29, 2013

Kueh bangkit (mom's recipe)

Kueh bangkit (mom's recipe)

I purposely named this mom's recipe, cos comparing mom's to the other blogger's, hers is quite 'cin cai' (simple), the way the ingredients are being measured, check this out:
 
  • 2 packets of tapioca flour (I was like 2 packets? What packet? I thought all brands have different sizing packets? But according to her, all of them comes in 500g packing.. Hm..)
  • 400g icing sugar (we reduced this to 300g)
  • Coconut milk (from one coconut) .. again.. I was like, how big is the coconut? What if I used a huge coconut but the coconut you used was small? ..
  • 6 egg yolk
  • 5-6 pandan leaves, cut into short section, washed and dried
  • pinch of salt
Despite of the cin-cainess, the recipe turned out to be a good one. No wonder she insisted we use her recipe. We made quite a lot from this recipe (about 200 or more), but it was alright, cos we wanted to pack these into small little bags and served them as party favors for the kids for Josh's first birthday, which answers the reason why we are baking kueh bangkit in October, and CNY is not till 3 months later :p  
 
Lil' fella's first birthday's party favors


Instructions: (her recipe consists of no instructions, it's all in the memory, hahaa, but for keepsake, I better write it down)
  1. Place flour and pandan leaves in a wok. In low heat, fry until the flour is light and fluffy, and the pandan leaves turned crispy. Cool and sieve the flour.
  2. Beat eggs and icing sugar till light and pale.
  3. Add in the cooked flour and mix thoroughly.
  4. Gradually drizzle in the coconut milk until the dough is kneadable (may not need to use up all the coconut milk).
  5. Start to knead the dough, until the dough is smooth and is not sticky. Cover the dough with a damp cloth, rest for 30min.
  6. Dust the counter top with some cooked tapioca flour. Also dust the cookie cutter.
  7. Grab a chunk of dough, roll to about 0.3cm thickness, and use the cookie cutter to cut out the desired shape.
  8. Place cut out kueh bangkit onto a lined baking tray. Preheat the oven to 150deg (fan-forced).
  9. Bake for about 15-17min.
Kueh bangkit is always my favorite cookie during the Chinese New Year, I love the way it melts in the mouth when you place it inside the mouth, and this recipe does that. I am glad that we were able to bake it for my son's first birthday, glad to be trying out this recipe, cos CNY is not far away from now. Will definitely bake this for coming CNY :)
 
Note: Kueh bangkit still has that slight crisp on the outside but melts in mouth as soon as it contacts  your saliva. However, it is soft when fresh out of the oven. The crisp only appears once cooled.


Monday, October 28, 2013

My best choco-banana cupcakes


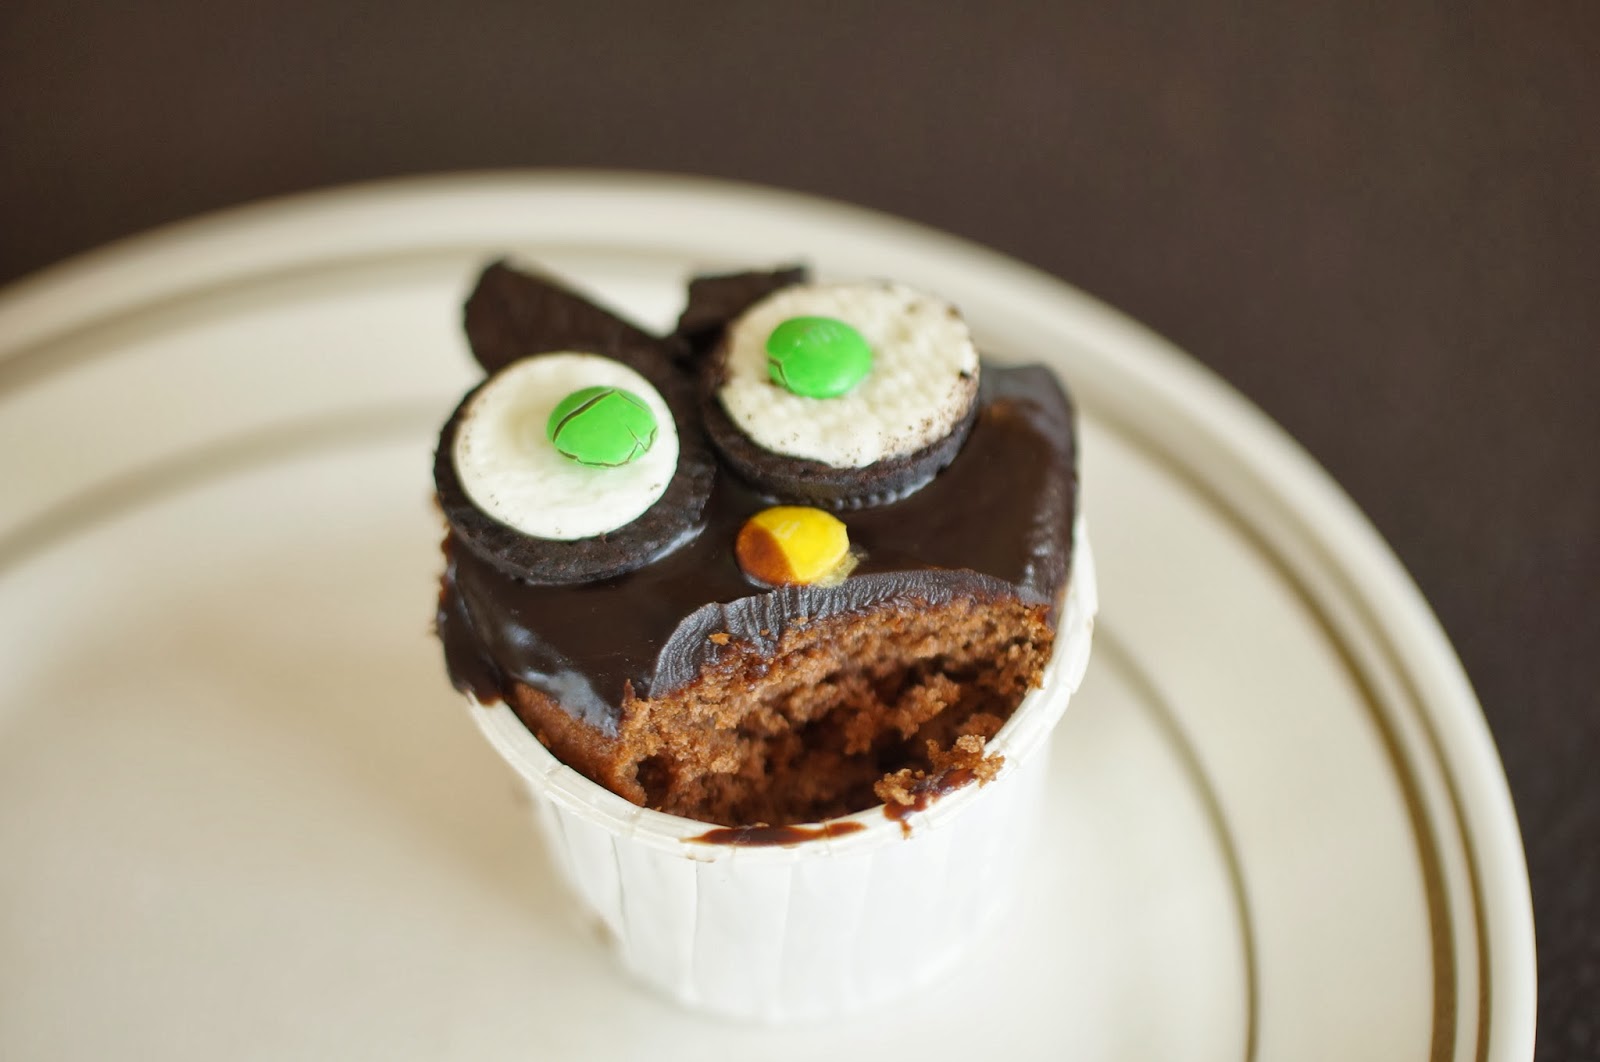
The accidentally crushed M&M created an even better effect.


Cutie mini oreo on sticks and marshmallow pops


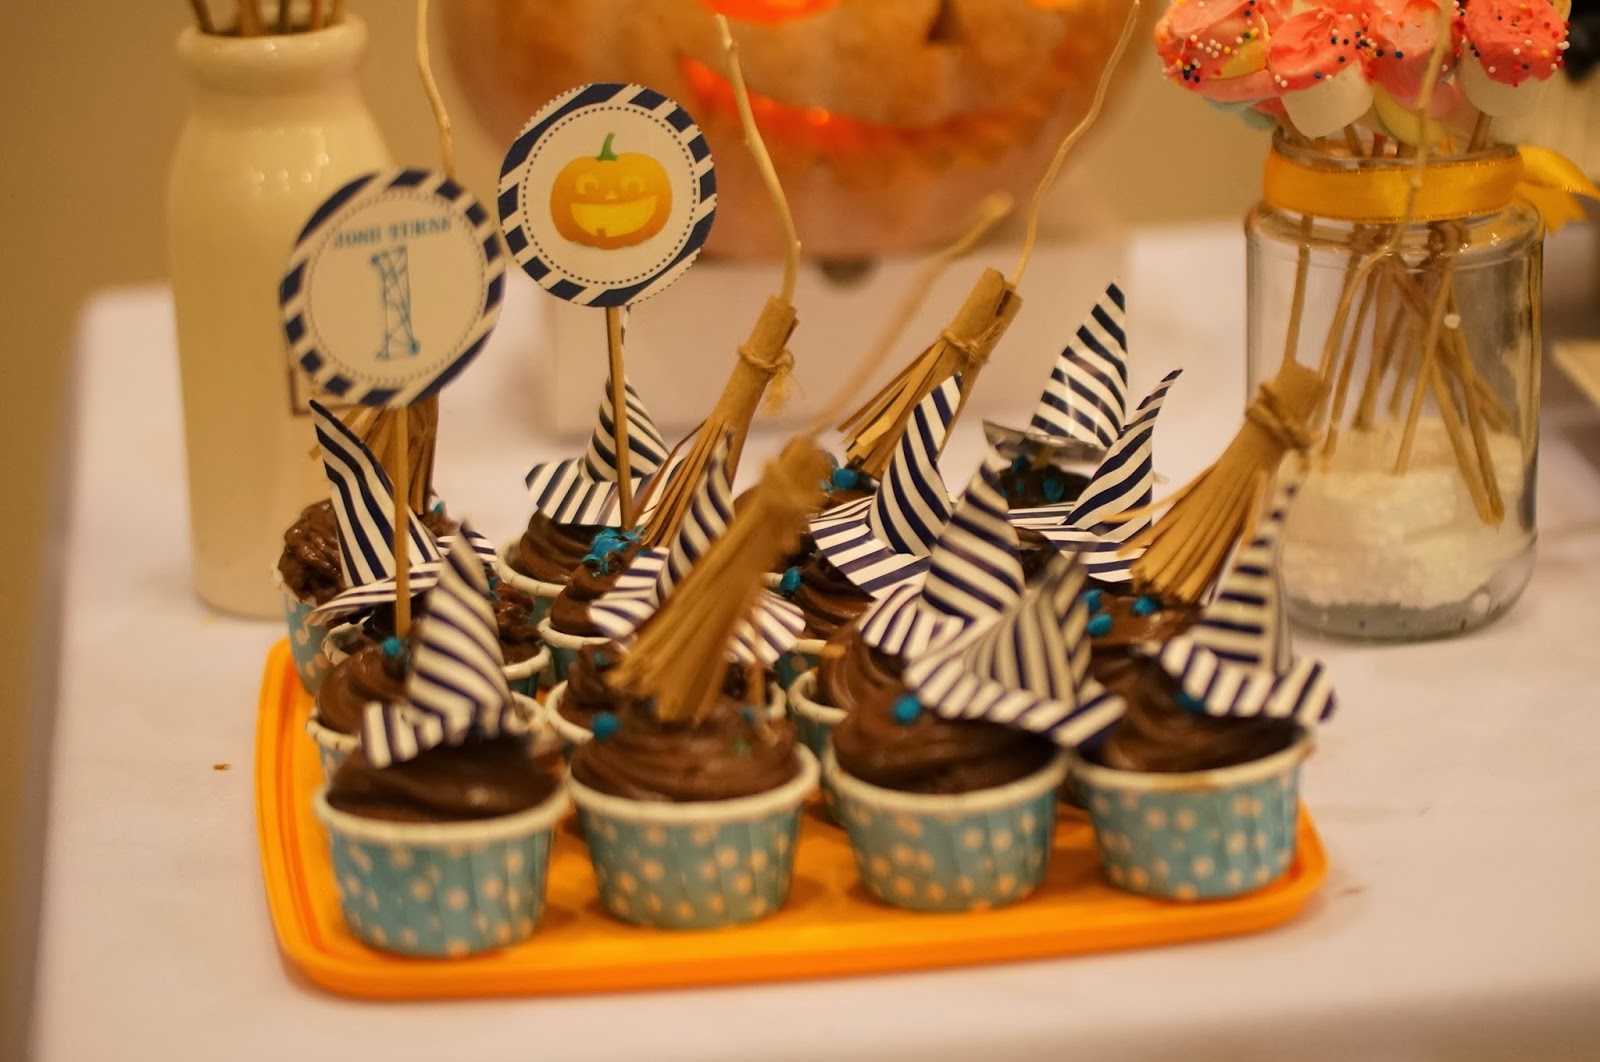
My favorite cupcake topper - witch's broom

 
It was Josh’s first birthday cum Halloween party and I wandered on a few recipes for his birthday cupcakes. I needed a recipe that is fairly simple and straightforward, yet delicious enough to be served to all guests. I needed to bake 60 of them so it can’t be something too complicated.
Initially I wanted to use a sponge cupcake for the base. Tried out a few times, and I realized it wasn’t as ‘simple’ as I thought it would be. The yolk and white separation and beating needs to be quite precise and done well to make good cakes. So I ditched the idea after failing on a couple of attempts making good sponge cakes. My buddy Kim then suggested why not I bake chocolate cupcakes. I considered on it, and thought, why not, it’s chocolate and everybody loves chocolate.

I tried out a few different chocolate cupcake/muffins recipes and finally I chose this. This is highly rated by Ann. I tried it out about two weeks ago baking it for Karen. I realized the cupcakes were super moist and soft a few hours out of the oven. After about a day, it turned quite dry. I couldn’t understand it, cos Ann said that it remained soft and moist even after a day, and it was better after chilled.

On the actual day of baking, I made slight adjustments to it and I knew the slight adjustments shouldn’t ruin the cupcakes. I changed the milk to chocolate milk, reduced the sugar (cos I ran out of sugar), added mashed banana to the recipe and some other minor details (see below for my recipe). It turned out to be the BEST chocolate cupcakes I have ever done! It was still soft and moist even after a day, in room temperature or chilled.

I baked 60 or a little more, I didn’t count. I knew I had more than 60. Baked about 40 standard size and over 20 mini ones. I made two different types of toppings for the cupcakes. Most of the standard size ones were decorated with cute owl-face using mini oreo (which was not easily available in Malaysia, I bought them when I was travelling back from Bangkok at Bangkok Don Muang Airport), mini M&Ms and chocolate ganache (a recipe by Martha Stewart). The mini size ones were frosted using the same chocolate ganache, but whipped and topped with chopped blue M&Ms (to fit in the theme) and some were topped with my DIY witch’s hat and broom (my fav!)

Here’s my recipe for 60 choco-banana cupcakes (make your own adjustment to bake the amount you want)
Recipe modified from Ann’s must-try chocolate cupcakes
  • 300g butter, at room temperature
  • 500g sugar
  • 6 eggs, at room temperature
  • 1tbsp pure vanilla extract
  • 2.5 cup chocolate milk
  • ½ cup of whipping crème/ heavy cream (if you don’t have this, you can just replace this with milk or chocolate milk)
  • 3 tsp baking soda
  • 580g superfine flour (or cake flour)
  • ¾ tsp salt
  • 3tbsp baking powder
  • 50g cocoa powder (I forgot to tripled this from the original recipe, that’s why my cupcakes didn’t appear as dark)
  • 1tbsp chocolate emulco (optional)
  • 9 banana, ripe (I freeze the bananas whole, cos they were too ripe 3 days before the actual day, and on the night before I defrosted them in the fridge)
Instructions:
1.     Sift flour, salt, baking powder and cocoa powder in bowl. Dissolve baking soda in chocolate milk.
2.     Cream butter and sugar till light and fluffy. Add vanilla essence and eggs, one by one, continue beating.
3.     Add in the mashed banana and the rest of the ingredients, chocolate milk and flour mix. Beat till smooth.
4.     Bake in a preheated oven at 160deg (fan-forced) for about 15min (for standard size) and 12min (for mini size). Adjust the temperature for your oven. My oven is a little on the strong side.
5.    Leave to cool on rack before decorating/ frosting.
The owl-decorated cupcakes didn’t need to be chilled but the chocolate ganache frosted cupcakes must be chilled or else the frosting may melt in our temperature.

Note:
1. The Oreos turned soggy after getting in contact with the chocolate ganache.
2. Love it that it was themed Halloween. I got quite messy when decorating or frosting the cupcakes. But it was okay to my own standard, cos it's Halloween, it's supposed to be messy, not neat :p
3. Make all the preparation ahead, this is a doable recipe, I made and decorated all in about 4-5hours.
Read more about the party here:
 

Saturday, October 19, 2013

Simple strawberry swirl cheesecake cups (Wendy's birthday)

This is a seriously simple one. They are made for another dear friend, Wendy's, birthday. I have tried baking complicated cakes for birthday and I always end up making silly mistakes and last minute messes. So this time, I decided I will make this simple, fuss-free, almost fail-proof cheesecake cups.
 
I got so laid-back, that I didn't even want to go through the hassle of making the base for the cheesecake cups. I just place one oreo cookie at the bottom, pour in the cream cheese batter and bake. But I did make the effort of creating these beautiful swirls using some syrups I whipped up using strawberries and blackberries.  


Taking a sneak peep at the cheesecakes


Mom kindly entertained and cared for Josh when I made these.

Recipe (modified from here)
Makes 7 cupcakes in square liners

For the crust: 7 Oreo cookies

For the strawberry and blackberry swirl
  • Handful of strawberry and/or blackberry (I used frozen ones)
  • 1tbsp icing sugar
Heat up all ingredients in a pan until the berries turn soft and the sugar has melted. Pass the mixture through a fine mesh to obtain the syrup.

For the cheesecake
  • 250g cream cheese, at room temperature, cut into small cubes
  • 200g sugar**
  • Pinch of salt
  • 1 tsp vanilla extract
  • 1 large eggs, at room temperature
Preheat the oven to 160deg C (fan forced).
 
Beat the cream cheese on medium-high speed in the bowl of an electric mixer until fluffy.  Blend in the sugar until smooth.  Mix in salt and vanilla.  Beat in the egg, mixing well.
 
Place one oreo cookie on each cupcake liner. Then put in about 2-3tbsp of the cheesecake batter over the oreo cookie. Make 3 dots of strawberry/blackberry syrup over the cheesecake batter. Use a toothpick to lightly swirl and create the marbled effect.
 
*Take note that the cheesecake will puff up to create a beautiful dome when in the oven and will sink slightly after cooled.
**I have already greatly reduced the amount of sugar, I still felt that it turned out sweet. But I had good reviews over them, even my friends who are constantly on a diet, they finished eating them. So I guessed they liked them.
 
This is another simple keeper recipe for cheesecakes. But I may reduce the sugar to 150g in future. If you don't have any berries at home, you may create the swirl using melted chocolate.

Thursday, September 19, 2013

Hearty pumpkin oatmeal with mashed banana


It has been raining this few days and the mornings has been quite chilly and wet. So I decided to make a hearty oatmeal for the lil' fella using pumpkin. One of my favorite dish with pumpkin is the sweet creamy pumpkin sago that is sometimes served at wedding banquets or dinner parties, and I would like to emulate that for the lil' fella using all the ingredients that are okay for his age (he's turning 11month old end of the month and he's still on a sugar and salt-free diet).
 
Ingredients:
*3tbsp pumpkin, cubed
*2tbsp rolled oat, soaked for about 2hours
*2cups water

Place all ingredients in a slow cooker and cook on 'high' mode for about 2-3 hours.

Serve with 1/2 mashed banana, 1tbsp breastmilk/ formula milk or fresh milk (for those above 1) and 1/2 tsp of virgin coconut oil. Optional: season with dash of all spice powder / cinnamon powder.
 
The pumpkin oatmeal turned out very creamy, just like how the adult's creamy pumpkin sago is. But it still tasted a little bland to me, which was the reason why I mashed in half a banana to sweeten it up. I have also added in 1-2 tbsp of milk to make it even creamier, which I later on thought that it can be optional. It was already quite creamy on its own. But for mommies with babies on nursing strike, having the milk in it would be a way to ensure that your lil' one is still getting his/her daily amount of milk.
 
This post is linked to the cooking/baking event, Yummy Homemade BabyFood, organized by me and Healthy Food for My Baby. To join, simply cook and bake any dishes for your babies under 2, using pumpkin (for month of September 2013). For more details, please see this.


Wednesday, September 18, 2013

Slimmed-down chocolate brownies (Ree Drummond)


September is indeed a month filled with lots of birthdays and celebrations. I just baked a birthday swiss roll for my sis. Today, I made another birthday cake for my sis-in-law. However, all of us in the family are on very strict calorie-watch diet this few days, trying to look our best for my sis-in-law's wedding in less than a week's time, so I have to bake a cake that is low in calorie and almost sugar-free cos most of us in the family dislike sweet stuffs. It isn't easy deciding on a cake to bake, considering that it still has to taste and looks great, but sans the calorie and sugar. I finally settled for a brownie, the chocolate would render it the sweetness even without any sugar added. The other reason that I chose brownie is because it's quite an easy recipe, like Martha Stewart once said, just dump everything in a bowl, mix and bake. I love fail-proof recipes. I have chosen this recipe by Ree Drummond, cos I am keen to join the blog hop event, Cook like a Star, organized by Zoe from Bake for Happy Kids.
 
Honestly, I have not heard of Ree Drummond prior to this, forgive me for my ignorance. For sweets and desserts, Martha Stewart is usually my foremost consideration cos I have done plenty of her recipes and they were almost fail-proof. But like what Zoe mentioned, the purpose of joining this Cook like a Star blog hop event, is to challenge ourselves to bake and cook with different techniques, learnt from different chefs.
 
Ree Drummond is a 'country' housewife chef and her recipes are quite the 'ranch' type (haha.. my definition of ranch is - uses lots of bacon, chops, cream, potato, farm vege for their recipes). Honestly speaking, if it wasn't for this bake along, I wouldn't have used her recipe. But I'm glad I did. I actually learnt two of her recipes in a span of 24 hours.


Here is the link for  Ree's original recipe. I have twisted it quite a bit to make it a slimmed-down version. Omitted the mocha icing, due to the amount of butter and sugar needed. Instead, I replaced it with a healthier kind of topping, raw cashew nuts and pumpkin seeds, chopped but not toasted, cos the brownies-baking process would roast the nuts and seeds anyway. I don't want them to get too roasted or burnt. I have also halved the recipe to make a brownie cake that fits in my 10cmx10cmx3cm square ramekin dish.
 
Here's my recipe (adapted from The Pioneer Women Cooks by Ree Drummond)
 
*60g chocolate (the ori recipe calls for unsweetened choc, I couldn't find unsweetened chocolate, so I omitted the sugar in this recipe)
*60g butter, in room temperature
*pinch of salt  
*2 whole egg, medium size
*1tsp vanilla extract
*70g cake flour (ori recipe calls for A.P. flour, I used cake flour, so it rises a little, I guessed either is okay)
*2 tbsp raw organic cashew nuts and pumpkin seeds, chopped, for use as topping, seasoned with pinch of salt
 
Makes 8 small slices of brownies
 
Instructions:
 
Preheat the oven to 170 degreeC. Butter a 10cmx10cm square baking pan/ ramekin dish with butter.
 
For the brownie batter: Place the chocolate in a microwave-safe bowl. Melt the chocolate in the microwave in 30-second increments, being careful not to let it burn. Set it aside to cool slightly.
(I never like melting butter or chocolate in microwave, I always have this assumption that it may tamper or alter the property, so I melted the chocolate in a bowl seated above a pan of boiling water)
 
In a medium mixing bowl, cream the butter and pinch of salt. Beat in the eggs. With the mixer on low speed, drizzle in the melted chocolate. Add the vanilla extract and mix. Add the flour to the bowl and mix just until combined; do not over mix.
 
Pour the batter in the baking pan/ramekin dish. Spread it to even out the surface. Top with chopped and salted nuts and seeds. Bake until the center is no longer soft, about 30minutes for my halved recipe. Cool.
 
Note:
1. Bake brownies in a bigger size pan if you want them a little thinner. Mine turned out quite thick because of the small ramekin dish I have.
2. Add about 1/2cup of brown sugar into this recipe, if you want your brownies to taste sweeter. My slimmed down version is quite bland, but it suits the entire family on calorie-watch.  
 
I am linking this post to Cook like a Star, organised by Zoe from Bake for Happy Kids, Yen from Eat your heart out and Mich from Piece of Cake. Wanna cook or bake like Ree Drummond? To join, simply cook or bake any recipe from The Pioneer Woman or her cookbooks and link with us at this Zoe's, this Yen's or this Mich's post for the whole month of September 2013.


Monday, September 16, 2013

Josh meets Mamalia (feat. Moo Cow Yogurt)

Mamalia from Moo Cow Yogurt Sandakan made an appearance and was giving away free yogurts. It was a Sunday and the lil' fella just got up from his nap. We went out for an afternoon 'yamcha' session and dropped by at Moo Cow for our lil' fella to meet Mamalia.

All of us was well surprised that he had no fear for the mascot Mamalia. In fact, he loved him. He was giggling non-stop playing with Mamalia and even extended his arms to him (a sign that he wanted Mamalia to carry him). The person in charge was terrified when he heard me saying that. Hahaaa.. he must be worried that the lil' fella may crush Mamalia. LOL!


Moo Cow Frozen Yogurt Sandakan is available at Bandar Prima, Mile 4.


Friday, September 13, 2013

A fuss-free trip to Kundasang (i-angel hipseat carrier Part 3)

 
Babywearing is great as it integrates my baby into my daily life. Best of all, I get to bring the lil’ fella along when I travel. I travel quite a lot, both for work and leisure. When he was 8month old, I have already made a few plane journey with the lil’ fella. Having him in my carrier (I also call it my kangaroo pouch) kept him secure and close to me in an environment that could be hectic and new to him, and given him the opportunity to nap whenever he wanted and I could have my hands free for all that I needed.  
I have been recommending all my mommy-friends to babywear when travelling, rather than pushing the stroller through the crowd. The baby will likely be happier up near the faces in the crowd rather than surrounded by a sea of legs. Babywearing gives the baby a good vantage point to see all of the excitement. The flight attendants seem to love babywearing-moms too, there were a couple of occasions I have been greeted with friendly comments from them saying that, more mommies should do this. In my mind, I think that’s also because babywearing reduces overstimulation and crying-episodes from babies, thus making their jobs easier. Travelling with MAS or AirAsia, there is no need to remove the baby from the baby carrier when the plane takes off or lands (for infant under 2 years old). But after taking off, I usually let him out of the carrier, into the bassinet for extra mobility.
Prior to owning an i-angel hipseat carrier, I flew with him with my snuggbaby SSC (soft structure carrier) which I also love. But his growing weight was slowly putting a toll on my shoulder and upper back. I was ecstatic when I get to try the i-angel as I realized the way it is being designed (the broad and thickly padded shoulder straps and also the hipseat) helps to redistribute the weight of the baby and takes the burden away from my shoulder.


Babywearing him with Snuggbaby


Babywearing him with i-angel hipseat.

It was the end of August and it was a public holiday on a Saturday, and it was also YC's birthday, which falls on a public holiday every year, hahaa.. lucky him, we decided to take a two days jaunt to the breezy Kundasang with the lil' fella and some of YC's buddies and family. I have decided to bring along the i-angel hipseat carrier and it was the best decision made. The stroller was never part of the consideration. Tried bringing a stroller for our travel once, and that was it, the first and the last time. He wouldn't settle for the stroller probably of the low vantage point, and  he couldn't nap in it, he just didn't feel secure I presume.
 
The weather in Kundasang was very pleasant, about 25deg C daytime and can be about 15 to 20deg C at night. This nice cool weather made babywearing even more pleasant. I loved the feeling of the lil’ fella all snuggled up against me. It gave warmth to both of us. He was excited throughout the trip and was resisting nap at his usual times. But I needn’t worry much as I was babywearing him. He would just nap in it when he gets really sleepy, and the rest of us proceed with the trip unaffected.

We visited the Desa Milk Farm, where we got to see the cows queuing up to get milked. Hahaa.. it was quite a scene seeing the amount of cow waiting for their turn to be milked. There were food awaiting for them at the milking cubicles, which explained the reason why the cows would willingly and punctually be there at 3pm every day.  


We also got to feed baby cow with their mom’s milk using a baby’s milk bottle (hm…I found this awkward, even human baby should be directly latching on mother’s breast, why would a baby cow wanna be drinking from a bottle). Even Josh got a little surprised when he saw his papa doing that. He must be wondering why the baby cow was drinking from his milk bottle. One thing that I must mention about the merits of babywearing is that I get to feel or detect the lil’ fella’s discomfort or fear almost immediately (he would grab me tightly or pinch me without him realizing it), which I usually soothe with a kiss of comfort on his forehead or pat his back, telling him that ‘it’s okay, mommy’s here’. This, I realized, is almost impossible if travelling with a stroller.

Comparing the i-angel hipseat carrier with my SSC, wearing him for a few hours in i-angel was a breeze and I didn't wake up with sore back the next day. I'm very pleased with it and would definitely recommend this to all mommies if you're looking for a carrier that can help relieve the baby's weight off your own back. Equally, the lil' fella was always happy and fuss-free being worn in it. He has this tendency of leaning and snuggling up closely against me whenever I wear him. This seems to be his way of telling me, 'Mommy I'm comfy in here'.  


Lil' fella got amused watching the cow fed with milk bottle.


Babywearing at Poring, Hot Spring.

That's about it for my babywear while travelling story at Kundasang. I shall look forward and update further on more trips with the lil' fella the coming few months. Stay tuned!


Where has babywearing taken you? And how has it benefited you?
 
The i-angel hipseat carrier was recently voted the best baby carrier in Korea among 13 popular brands in Korea! (Endorsement by: National Council of the Green Consumers Network in Korea) Info by babymarcel.

For further read, please see my part 1 and part 2 review on i-angel hipseat carrier:
Part 1: http://www.youtube.com/watch?v=W8eBa73B0FE
Part 2: Daily use at home http://a-nutritionist-mom.blogspot.com/2013/09/wonder-of-babywearing.html

Related Posts Plugin for WordPress, Blogger...