Showing posts with label cheesecake. Show all posts

Wednesday, June 11, 2014

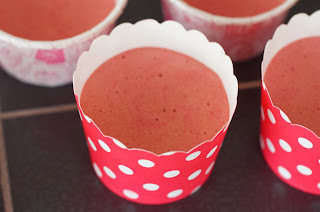
Steamed cheese cupcake


This is a simple steamed cheese cupcake for a kiddo's breakfast or snack. I learnt of this recipe from the fellow mommies from the Healthy Food For My Baby facebook group.

Ingredients (makes about 8-9 cupcakes)
  • 100g cream cheese, soften in a bowl over a pot of boiling water
  • 60g sugar (cut down to 50g)
  • 2 large eggs
  • 2tbsp fresh milk
  • 1 1/2 tbsp. grapeseed oil
  • 90g self-raising flour (I used cake flour)
  • 1tsp baking powder
  1. Soften cream cheese in a bowl over a pot of boiling water.
  2. Whisk with sugar until it turns fluffy. Add in egg and beat, one after another.
  3. Add in oil and milk.
  4. Sift in flour and baking powder and evenly combine.
  5. Pour batter into paper cupcake liner and steam for 12min.

Tuesday, May 27, 2014

Japanese cotton cheese chiffon (very good)

I made a good cream cheese chiffon two days back, it was good, moist and fluffy. But I felt that the cheese flavor is too light. I wanted more to it. And I wanted to give it more tang. So I kinda modified the recipe and came out with this. This is superb!! Finger licking good. I baked it at night, when cooled, I left it in the fridge. The next morning, we had it for breakfast. It tastes just like the Japanese cotton cheesecake we buy from the café. The sweetness is just right. This was baked for my little fella and the family. But if you're baking it for guests or giving it away as gift, you may wanna up the sugar by half or 1 tablespoon.


P/S edited on 11/3/2015
I have made passion fruit chiffon cake by replacing 40g of fresh milk with passion fruit *its juice and its flesh and reduced the lemon juice from 2tsp to 1tsp. Ka cha ka cha.. this is the sound you'll hear when you're biting on the chiffon cake because of the seeds from the passion fruit. For my little fella, I gave him the slices that hasn't got the seeds. I think he may spit them out and refuses to eat the rest if he bites on the seeds. It was lovely. The way the creaminess from the cheese combo with the tang from the passion fruit made this a very nice, especially if stored in fridge and eaten the next day. 


Ingredients
  • 50g vegetable oil (I used grapeseed oil)
  • 110g cream cheese
  • 40g fresh milk
  • 5 egg yolks
  • 1 whole egg
  • 60g cake flour + 2tsp corn flour
  • 1/4 tsp salt
  • 1.5tbsp brown sugar (or 2tbsp sugar if you're making this for guests)
  • 2tsp apple cider vinegar (or lemon juice)
  • 5 egg white
  • 4tbsp brown sugar
Baked using an 18cm chiffon tube
  1. In a bowl, dissolve cream cheese over a pot of boiling water. Add in milk and oil. Combine and make sure there are no lumps.
  2. Sift in cake flour, corn flour and salt. Set aside to cool down.
  3. Separate egg white and yolk in two separate bowls. Once the cream cheese mix has cooled down to a temperature that doesn't scald, add in the egg yolk one after one, and the whole egg. 
  4. Mix with a plastic spatula, add in vinegar or lemon juice and this becomes the egg yolk batter. Sit aside for use later (may keep in fridge for better results).
  5. In another bowl, beat egg white till foamy, add in sugar in 3 separate batches until stiff peak forms.
  6. Scoop out 1/3 of the egg white peak and add into the egg yolk batter. When combined evenly, add it back to the remaining egg white peak. Combine evenly with a spatula.
  7. Pour the chiffo batter into the chiffon tube pan, topped bake in a preheated oven at 150deg C for 40min. *I tented an aluminum foil over the top of chiffon at 20th min to avoid over browning of the top.
  8. Invert cake to cool once out of the oven.

Monday, May 26, 2014

Cream cheese chiffon


Caught you! You little chiffon cake thief!!
Here's the cheekiliscious chiffon thief.


My little boy has this habit of grabbing a piece of my chiffon cake whenever I am still snapping photos of it. I used to stop him. But not anymore. I'm actually glad he loves my chiffon cake. It gives me great desire to bake more chiffon cakes for him. The other reason about chiffon cake is that I love to be able to remove it from the chiffon tin with my bare hands. It felt good to unmould a beautiful and almost perfect chiffon cake. 所谓的空手脱模,是非常有满足感的。 This recipe doesn't taste very heavy on the cheese, but it was very soft, moist and fluffy.


Ingredients
  • 60g butter
  • 80g cream cheese
  • 60g fresh milk
  • 5 egg yolks
  • 1 whole egg
  • 60g cake flour + 2tsp corn flour
  • 1/4 tsp salt
  • 1tbsp brown sugar
 
  • 5 egg white
  • 4tbsp brown sugar
To create marble effect (Optional)
  • 1tbsp cocoa powder
  • 1tbsp hot water
Baked using an 18cm chiffon tube
 
  1. In a bowl, dissolve cream cheese with butter over a pot of boiling water. Add in milk. Combine and make sure there are no lumps.
  2. Sift in cake flour, corn flour and salt. Set aside to cool down.
  3. Separate egg white and yolk in two separate bowls. Once the cream cheese mix has cooled down to a temperature that doesn't scald, add in the egg yolk one after one, and the whole egg. 
  4. Mix with a plastic spatula and this becomes the egg yolk batter. Sit aside for use later (may keep in fridge for better results).
  5. In another bowl, beat egg white till foamy, add in sugar in 3 separate batches until stiff peak forms.
  6. Scoop out 1/3 of the egg white peak and add into the egg yolk batter. When combined evenly, add it back to the remaining egg white peak.
  7. Combine cocoa powder with hot water. In another clean bowl, combine with about 2-3tbsp of batter.
  8. Pour the white/ yellow batter into the chiffon tube pan, topped with cocoa batter and bake in a preheated oven at 150deg C for 40min. *I tented an aluminum foil over the top of chiffon at 20th min to avoid over browning of the top.
  9. Invert cake to cool once out of the oven.
P/S: This recipe is quite a light one, most people won't be able to detect the cheese in it. I have later on modified this recipe by adding more cream cheese and replaced the butter with oil. Also added apple cider vinegar to it to up the tang. The modified recipe is shared here.


I'm submitting this post to  Little Thumbs Up organised by Zoe of Bake for Happy Kids and Doreen of My Little Favourite DIY and hosted by Tze of Awayofmind Bakery House.


Tuesday, December 24, 2013

Pink japanese souffle cheese cupcakes (beet and mango)

I'm quite nervous when I decided to do this, cos I previously failed big big time when I tried to bake soufflé cheese cupcakes using the steam-bake method. I couldn't master the baking temp. and time for my oven. Keeping my fingers crossed that it turns out good. The girls are coming over to mine tomorrow for a Christmas bake, so I wanted to bake some treats for them. I was thinking of baking the beet red velvet cupcakes that I made yesterday, but seeing that we'll be baking more sweets, I should perhaps serve them something light and not that dense. And I thought of this. Super light! It melts in the mouth. And it's something I wanted to try again after the failure I hit some time back. Most importantly, I wanted to use up the pureed beet I had after making them for my red velvet cupcakes. Love the pink color. Best of all, it's all natural colorant. No artificial stuff in it. Such is the wonder of nature. So beautiful.




This cake has the 'melt-in-your-mouth' texture, just the way it's called, soufflé. But it is so light that one will never be enough. Hohohooo..

This is a recipe that I adapted from a fellow baker from the Facebook group Baking Wonderland.

*125g cream cheese, softened/ melted over bath of hot water
*60ml beet puree
*40ml buttermilk (or milk) (if you want the texture of this cake to be denser, replace this with cream)
*1tbsp grapeseed oil
*3 egg yolk
*1tbsp molasses sugar (fine)***
*1tbsp lemon juice
*30g superfine flour/ cornflour

*3 egg white
*3tbsp of molasses (fine)

*abt 2tbsp of chopped up mango (optional)

***The sugar content of this cake has been greatly reduced. Please top up with another 2tbsp sugar if you like your cakes sweet.

1. Combine fully melted cheese with beet puree, buttermilk and oil.
2. Beat egg yolk with sugar till it turns thick.
3. Combine egg yolk mix with cheese mix. Add in lemon juice.
4. In another mixing bowl, beat egg white with molasses till it forms a stiff peak.
5. In 3 batches, add the egg white meringue into the egg yolk batter.
6. Combine thoroughly and divide batter into 12-13 cupcake liners. Top with few cubes of fresh mango.
7. Tap the cupcake a few times to remove trapped air (not too sure it's needed here, but it's just a usual procedure I do with light cakes)
8. Bake (steam-bake) at 150deg C for 35-40min. This was baked using my toaster oven.

Hooray!! I've finally succeeded with my 'steam-baked' Japanese soufflé cheese cupcakes.

This should be my last post before Christmas. Merry Christmas!!


I'm submitting this post to Baby Sumo's Christmas Recipe Collection 2013 event, hosted by Baby Sumo of Eat Your Heart Out.


Saturday, November 2, 2013

Non-baked Japanese steamed cupcakes (cheese and blackcurrants)

I love these. These are sooo Japanese. Not just the look and texture. Even its recipe is very Japanese. You know how Japanese's stuffs are very cute, small and dainty. So is this recipe. Its a recipe that yields only 4 cupcakes! (5 for my case). It's a recipe I learnt from Nami, a Japanese who's now living in the US. I have always wanted to try out some of her recipes, cos they look really pretty and simple and I have no regrets after trying this out.


Over generous blackcurrants added into it.

"Would you like a bite?"


Verdict? Photos of my little one tell it all. Hahaaa.. It was not the very soft kind of mushi-pan type of bun you find at Sunmoulin. But it was good. The flavor was very subtle, cos I further reduced the amount of sugar. But it has the tang from both the cheese and blackcurrant. With such simple ingredients and steps, I wasn't expecting a WOW type of texture from it. But again, this is definitely another keeper recipe for me, cos it can be such a versatile recipe. I can literally add ANYTHING to it and it's something different every morning. 
 
Basic Steamed Cake recipe from Just One Cookbook by Nami
  • 1/2 cup (75g) all purpose flour* (or self raising flour)
  • 1 tsp. baking powder (if you're using self raising flour, just add 1/2 tsp baking powder)
  • 1 egg
  • 2 Tbsp. milk or cream  
  • 2 Tbsp. sugar (I used 1tbsp brown sugar)
  • 1 Tbsp. vegetable oil (I used grapeseed oil)
  •  
    Add your favorite ingredients - it was cheese and dried blackcurrant for me
  • 1/4 cup dried blackcurrant
  • 1/4 cup grated cheddar cheese
  •  
    You will also need
  • 4 cupcake liners
  • 4 ramekins / ceramic bowl or I used silicone cupcake liner and had paper liner inside it
  •  
    *This recipe was supposed to yield 4 cupcakes, but I made 5 from it.
     
    Instructions:
    1. Sieve flour and baking powder. Add sugar into it.
    2. Beat in egg, milk and oil. Add in grated cheese and blackcurrant. Mix gently. Do not overmix.
    3. Place about 1tbsp of batter into paper cupcake liner and place in a silicone cupcake holder.
    4. Steam for 8min.
    Note: Cover the lid with kitchen towel. This will prevent the water formed from condensation to drop on the cupcakes.

    Saturday, October 19, 2013

    Simple strawberry swirl cheesecake cups (Wendy's birthday)

    This is a seriously simple one. They are made for another dear friend, Wendy's, birthday. I have tried baking complicated cakes for birthday and I always end up making silly mistakes and last minute messes. So this time, I decided I will make this simple, fuss-free, almost fail-proof cheesecake cups.
     
    I got so laid-back, that I didn't even want to go through the hassle of making the base for the cheesecake cups. I just place one oreo cookie at the bottom, pour in the cream cheese batter and bake. But I did make the effort of creating these beautiful swirls using some syrups I whipped up using strawberries and blackberries.  


    Taking a sneak peep at the cheesecakes


    Mom kindly entertained and cared for Josh when I made these.

    Recipe (modified from here)
    Makes 7 cupcakes in square liners

    For the crust: 7 Oreo cookies

    For the strawberry and blackberry swirl
    • Handful of strawberry and/or blackberry (I used frozen ones)
    • 1tbsp icing sugar
    Heat up all ingredients in a pan until the berries turn soft and the sugar has melted. Pass the mixture through a fine mesh to obtain the syrup.

    For the cheesecake
    • 250g cream cheese, at room temperature, cut into small cubes
    • 200g sugar**
    • Pinch of salt
    • 1 tsp vanilla extract
    • 1 large eggs, at room temperature
    Preheat the oven to 160deg C (fan forced).
     
    Beat the cream cheese on medium-high speed in the bowl of an electric mixer until fluffy.  Blend in the sugar until smooth.  Mix in salt and vanilla.  Beat in the egg, mixing well.
     
    Place one oreo cookie on each cupcake liner. Then put in about 2-3tbsp of the cheesecake batter over the oreo cookie. Make 3 dots of strawberry/blackberry syrup over the cheesecake batter. Use a toothpick to lightly swirl and create the marbled effect.
     
    *Take note that the cheesecake will puff up to create a beautiful dome when in the oven and will sink slightly after cooled.
    **I have already greatly reduced the amount of sugar, I still felt that it turned out sweet. But I had good reviews over them, even my friends who are constantly on a diet, they finished eating them. So I guessed they liked them.
     
    This is another simple keeper recipe for cheesecakes. But I may reduce the sugar to 150g in future. If you don't have any berries at home, you may create the swirl using melted chocolate.
    Related Posts Plugin for WordPress, Blogger...