Showing posts with label bun. Show all posts

Monday, March 21, 2016

Homemade kid's burger


Few friends have been asking me for recipe for burger bun, I thought we shall have burger as lunch today, so I can take pics and share about my burger bun recipe. Unexpectedly, when I was preparing for lunch, he told me he doesn't wanna have burger for lunch. He wanted rice instead. Therefore, instead of serving his pork patty and egg in a bun, he has them with rice, whereas I have mine as a burger. 

The recipe for my burger bun is a recipe that I have been using to bake buns and loaves for our family for the past 3 years. For those of you who've been following my posts and blogs, you'll have come across this soft scalded dough recipe that I have been adapting from Alex Goh. I love it as it is versatile, it requires no advanced preparation and most importantly, it yields soft bread that stays soft for the next 2 days, without the need to add any softeners nor improvers. 

The only variations that I have been adopting for this recipe is the liquid (which can varies from milk, to soy milk, pandan milk, pumpkin puree + water, black sesame powder + water and etc) and its sugar and salt content. 

The patty was a recipe adapted from Jamie Oliver's. I have sneaked in chopped onion and carrots into it for my little one who is in the phase of 'no green veg except for green beans'. I have also marinated my minced pork with extra ingredients to add to the flavor, including 1/2 teaspoon of grated ginger and oyster sauce. 

Recipe for the burger bun 
*This scalded dough method are specially adapted to create buns that are soft and fluffy in texture and remain soft for at least 24-48 hours. The method of pre-scalding a portion of the dough also helps to loosen the gluten in the bread, making it able to create more volume. This bread is soft and easy to digest, making it a perfect nutritious snack for babies and kids. 

Scalded dough
  • 100g bread flour 
  • 70g boiling water 
To prepare the starter dough, pour boiling water over flour and stir with folk until combined into a slightly tacky dough. Set aside while preparing other ingredients as per following. 

Main dough
  • 40g grapeseed oil / other cooking oil 
  • 160g water / milk
  • 1tbsp brown sugar (if you prefer sweeter bun, may increase to 2-3tbsp) 
  • 1/2 tsp salt 
  • 200g bread flour
  • 50g rye flour 
  • 2tsp active dry yeast
For the main dough: 
  1. In a big bowl, combine bread flour, rye flour, liquid, oil, sugar and salt. Add active dry yeast and mix well.  Tear the starter dough prepared ahead and knead into the main dough. Knead for 10-30 minutes until smooth and elastic. 
  2. Once nicely kneaded, the dough should be able to be pulled and stretched into a thin membrane - Window pane test: Grab a ball of the dough and try stretching the dough until  it is as thin as a membrane without tearing). 
  3. First proof - Form the dough into a round ball and let it rise until double in size. Cover with cling film (should take about an hour in warm weather). 
  4. Punch down, knead and form into a ball shape. This recipe makes about 8 buns. Brush top of buns with water and sprinkle with white sesame seeds. 
  5. Second proof - Cover buns loosely with cling film. Let rise in a warm environment for about 30-45min. I usually do this in a preheated oven. 
  6. Once the buns have doubled in size, bake in a preheated oven at 180deg C for about 13min, or until golden brown. Oven temperature and time may differ according to make of ovens.
Recipe for pork patty
  • 250g minced pork, marinated with oyster sauce, soy sauce, salt, grated ginger, dash of sesame oil, black pepper powder, pinch of corn flour 
  • 1/2 onion, finely minced 
  • 1/2 carrot, finely minced 
  • 2 slices of bread, lightly toasted and blitzed to turn into crumb 
  • 1 egg, beaten 
  1. In a frying pan, heat up a tablespoon of oil. Add in chopped onions and carrots. Fry until the onions have softened. Set aside to cool. 
  2. Combine minced pork, fried chopped onion and carrot that has cooled down, bread crumbs and beaten egg. Divide into 6 equal balls. 
  3. Roll the balls into burger-shaped patties about 1cm thick. Store the patties onto oiled tray, cover with cling film and leave in fridge for at least an hour, or until the patties firm up. I did this the night before. 
  4. To cook the patties, heat up a frying pan with 2 tablespoon of oil. Cook the patties for about 3 minutes on each side, or until golden brown. 
  5. Serve patty with sliced cucumber, tomatoes, cheese or egg, in a bun, or alternatively with rice.  

Monday, August 25, 2014

Chia seeds bun


Mulberry and Chia Seeds Bun

My quest of cooking with chia seeds everyday (ie. to incorporate chia seeds into everything I cook or bake) started last Friday. Then on Saturday I made a beautiful banana and chia seeds cupcake. On Sunday morning, I made chia seeds omelette for the lil' fella. Oh, on a side note, it's amazing how fast kiddos grow. At 22month old, the lil' fella is already having two-way communications with us. When we picked up his grandma and grand-aunty from their house, his grand-aunty just casually asked him, have you eaten? To all our surprise, he answered, egg-egg and 'choi-choi' (which is vege in Cantonese), which was exactly what he ate that morning. I was in awe! 

Guess I need to be very careful what I feed him. Hahahaa.. not that I would feed him much sort of unhealthy stuffs anyway. Actually, I'm getting nervous if he would complain to his grandma that I only feed him oat and salad. Oppssss..

Oh yes, this was his breakfast which he described to his grandma. 
Today I baked some very very soft and fluffy chia seeds buns. I didn't have anything fancy in this bun, only chia seeds. Hahaa.. Chia seed is the fancy stuff then. Well, that's because I wanted to bake these and bring some to our very dear family friend, now in Palliative Care Unit in the Hospital Duchess of Kent in Sandakan. I didn't know about Palliative Care.  Palliative Care is a specialized medicare care for patients with serious illnesses (yet without guaranteed cure). It focuses on providing patients with relief from pain and stress of the serious illness, whatever the diagnosis. I felt down everytime I think about it. 

Anyway, I wanted to bake these for her, because the last time I saw her, she was telling me about this method of baking bread that yields really soft bread (ie the scalded dough method) and she had been wanting to try it but she couldn't because of her condition. I told her yes, this method works and I have been baking with it all this while. Refer to this previous post if you want to know more about this method. The addition of chia seeds into this recipe, combined with the method of scalded dough, made these buns super soft and fluffy. I hope Aunty R will get to try it and she'll love it. 

Scalded dough 
  • 100g bread flour 
  • 70g boiling water 
To prepare the scalded dough, pour boiling water over flour and stir with folk until combined. Cover and chill in the refrigerator. Keep for 20min before use, can keep up to 12hours in refrigerator. 

Main dough 
  • 50g rice bran oil / grapeseed oil
  • 250g water 
  • 1.5tsp chia seeds soaked in 2tbsp water 
  •  3tbsp dark muscovado sugar 
  • pinch of salt 
  • 300g bread flour (Hi-protein flour) 
  • 100g all purpose flour 
  • 1tsp instant active dry yeast 
Instructions 
  1. I kneaded this using my trusty breadmaker. 
  2. Add all the ingredients in the order listed above in breadpan. Select mode for dough. Press start. 
  3. When the ingredients have combined together (about 5min into kneading), add in the scalded dough by pieces. 
  4. After 1hr30min, a beep alert will sound indicating that the dough is ready. 
  5. Remove the dough from the breadmaker. 
  6. On a floured surface, punch the dough and knead a few times to remove trapped air. Form into about 200-230g (oh, I made four big buns with this dough). Brush top of buns with water, sprinkle with choice of topping (in my case, it was pumpkin seeds). 
  7. Preheat the oven to 50deg for 3min. Turn off the oven. 
  8. Place the bun in the oven for second rise (about 30min) or until the buns double their original size. 
  9. Preheat the oven to 175degC. Bake the buns for about 15-20min. 


Tuesday, August 12, 2014

Japanese milk tea bun with raisin & cinnamon sugar


Here's a very beautiful yet soft and fluffy Japanese milk tea bun with very generous amount of raisin. I replaced the liquid in this recipe with Japanese milk tea (as in photo). I have also replaced the sugar in this recipe with cinnamon sugar (made up with 1:1 ratio of brown sugar and cinnamon powder). The bun turns out smelling very fragrant and soft. A friend of mine A whom had this wasn't sure if her son would like it due to the alien spice (ie cinnamon) in it, the next morning she called me up and told me that her son loved it! Made my day :) 

Take more cinnamon. It's great. Cinnamon may help lowers risk for diabetes. It also helps fight against fungal and bacterial infection. Some researchers had also done research which revealed that diets rich in cinnamon can help reduce the body's negative responses to eating high-fat meals (Source). 

Here's the recipe 

Prepare scalded dough
  • 100g bread flour (Hi protein flour) 
  • 70g hot water 
Combine both in a bowl. Stir with a chopstick or folk to ensure both combine thoroughly. Cover and keep in fridge for about 15-25min. 

Prepare the main dough (I kneaded this in my breadmaker) 
  • 3tbsp rice bran oil 
  • 250g Japanese milk tea (made up with one sachet) 
  • 2tbsp cinnamon sugar (made up with 1tbsp brown sugar and 1tbsp of cinnamon powder) 
  • pinch of salt 
  • 300g bread flour (Hi protein flour) 
  • 100g all purpose flour (plain flour) 
  • 1tsp instant active dry yeast 
4tbsp raisins, chopped
2tbsp butter, melted with 1tsp cinnamon powder and 1tbsp brown sugar  
  1. Add all the ingredients (in the order listed above) in bread pan, except for scalded dough and raisins and butter. 
  2. Select mode for dough 发面。 The display panel will display defaulted time of 1hr30min. Press start. 
  3. When the ingredients have combined together (about 3min) add in the scalded dough by pieces. 
  4. After 1hr30min, the breadmaker will beep to indicate that the dough is ready. 
  5. Remove the dough from the breadmaker. 
  6. On a floured surface, punch the dough to remove trapped air. Knead and throw a few times. Divide into 6 equal portions weighing about 130-150g each. 
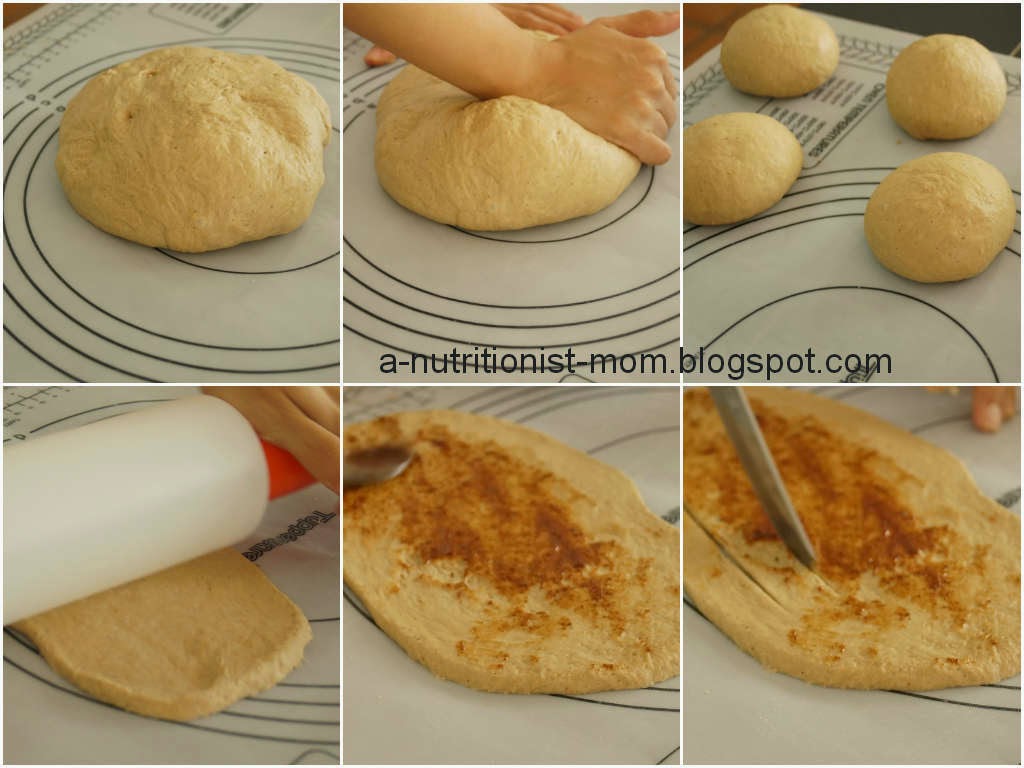
  7. With a rolling pin, flatten the portioned dough into a flat oval disk. Spread 1tsp of butter-cinnamon spread on the disk. Sprinkle with chopped raisins. Cut the flat disk into 4-5 strips but leaving one end intact (not cut). Roll up the entire strip disk to form a long twig. Twist one end, 3-4 times, and form the twisted twig into coil. Place the bun on a baking tray. Repeat with the remaining portioned dough. See my facebook link for a short video clip on this step. https://www.facebook.com/photo.php?v=10154491536890352&set=vb.577660351&type=2&theater&notif_t=like 
  8. Brush top of bun with water. Sprinkle with more cinnamon sugar. Let rise until the bun double their original size (takes about 30-45min). 
  9. Preheat the oven to 170deg C. Bake the buns for about 18-20min. 


The last 2 steps are re-illustrated using table cloth in the following diagram. 


This post is linked to the event Little Thumbs Up (August 2014 Event: Flour) - organised by Zoe (Bake for Happy Kids) and Mui Mui (My Little Favourite DIY) and hosted by Diana from Domestic Goddess Wannabe.


Black sesame and oat mantou (steamed bun)


Here's the recipe

Recipe modified and translated from Carol.

*old dough 100g (see following for preparation of old dough) *I did this step too, according to her, it improves the fragrance and texture to great extent. But I had to leave mine in room temperature for about 3hours for it to double its size. It didn't proof when in the fridge.
*300g Cake flour/  superfine flour (I didn't have cake flour at home. Instead, I used 270g all purpose flour with 2tbsp corn flour)
*1.5tbsp black sesame powder
*1tsp Instant active yeast
*100g fresh milk (lukewarm) 
*3tbsp rolled oat in 50g fresh milk (soaked for at least 15min)  
*30g Brown sugar
*1/8tsp Salt
*50g Rice Bran Oil

Preparation of old dough
*120g all purpose flour 
*1/2 tsp instant active yeast 
*80g warm water  
*pinch of salt 

  1. Place all ingredients in a bowl and knead till it becomes a smooth dough (about a few minutes, max). 
  2. Cover bowl with cling film and let proof for 6-8hours under room temperature, or let proof in fridge until the next day.  
  • Old dough that is not used up can be kept in the fridge for 3-5 days or in the freezer for at least 1 month. Thaw before use. 
 Instructions:
1. Combine all ingredients and knead. I used my Donlim breadmaker to knead. Knead until the dough is stretchy and has smooth surface (about 10min in my bread machine).
2. Leave to proof in an oiled bowl till it double its size. (i did this in the bread machine using the Proofing mode, about an hour)  
3. On a floured surface, punch the risen dough to knock out all the trapped gas.
4. Using a rolling pin, roll into a thin flat dough. Roll up like rolling up a swiss roll  
5. Cut into 10 equal pieces. (I made some into bun some, since he loves the round bun)
7. Place onto non-stick parchment paper.
8. Let proof for another 30-40min.
9. Steam in vigorously boiling water for about 12min. Wrap the lid with a tea towel to prevent the condensate from dropping back onto the pau, which will uglify the outlook. Do not open the lid right away. Let cool gently so that the skin of the pau wont turn wrinkly.


Monday, August 11, 2014

Wholemeal bun with raisins (straight dough) / Why bake your own bread?


Last Satuday, I had a bake-a-bread class at my organic shop Just Health. More and more people resort to baking their own loaves at home these days. The compelling reason was mostly heath-related. During the class, I also made extra effort to educate the clients on the 'not-so-healthy' stuffs that are used in baking commercial bread, including 
  • shortening / trans-fat (a cheap alternative to butter or plant oil, but carry the risks of clogging the arteries. The FDA had once mentioned that trans fat is a unique powerful promoter of heart disease. So ditch those margarine from your kitchen. They are not easily metabolized or digested, thus may accumulate in our body, causing further harmful effects on our liver).
  • bread improver (which consists of a variety of chemicals, including azodicarbonamide ADA, a type of chemical used to make yoga mat or base of our shoe. When used in baking bread, it allows bread to raise higher, stay soft for longer period of time and form an attractive looking crust. Prolonged exposure of this additive may cause asthma or skin sensitization).  
  • bleaching agent used to turn flour white (when the flour is bleached it produces alloxan. Alloxan is a poison that is used to produce diabetes in healthy experimental animals (primarily rats and mice), so that researchers can then study diabetes “treatments” in the lab. There is no other commercial application for alloxan, because it is so highly toxic) - here's the primary reason why I woud encourage you all to use unbleached flour to bake your bread. Unbleached flour are commonly found in premium supermarket or organic shops in Malaysia. 


Here' the recipe for this nice, soft and fluffy wholemeal bun. It's a straight dough recipe, unlike the normal scalded dough recipe that I always do. But it yielded very fluffy bun which was still good the next morning. I adapted this recipe from a fellow blogger, unfortunately, I copied the recipe and forgot whom I got it from. 

Recipe makes 10 buns
*I kneaded and proved the dough using my trusted Donlim breadmaker.  
  • 2tbsp rice bran oil 
  • 350ml water 
  • 1tsp salt 
  • 3tbsp molasses sugar 
  • 450g bread flour (Hi-protein) 
  • 100g plain flour / all purpose flour 
  • 50g wholemel flour (Hi-protein) 
  • 3tsp instant active dry yeast 

  • 2tbsp raisins & 4 black apricot, chopped (organic)
Instructions 
1. Add all the ingrediens (in the order listed above) in breadpan, except raisins and apicots.  
2. Select mode for dough 发面. Press start. When the dough has kneaded for about 25min, add in raisins and chopped apricots.
3. After 1hr30min, the breadmaker will beep indicating that the dough is ready. Remove dough from breadmaker.
4. On a floured surface, punch the dough to remove trapped air. Knead afe times. Divide into 10 buns and form into ball shape. Brush top of buns with water and sprinkle with white sesame seeds (optional).
5. Place the bun in the oven for second rise until the buns double their original size (about 45-60min).
6. Preheat oven to 170degC, bake the buns for 18-20min.

This post is linked to the event Little Thumbs Up (August 2014 Event: Flour) - organised by Zoe (Bake for Happy Kids) and Mui Mui (My Little Favourite DIY) and hosted by Diana from Domestic Goddess Wannabe.


Thursday, June 12, 2014

Homemade garlic bread

It's really nice I finally get to prepare just the one breakfast and it gets to be shared among all of us, including the lil' fella now at 19month old (I used to prepare two or three types of breakfast cos the lil' fella cant eat adult's food yet). This morning, I prepared this, made myself a great cuppa and we sat down near the tele allowing me to catch up on the AOD drama playback.
 
These days, I still have flash backs of those times when he was still little, I barely get time for getting myself ready, let alone eating breakfast. The whole morning was spent holding him, soothing him, getting him ready to go to the nanny's etc... I still get phobia thinking of those time. That's why nowadays I appreciate it very much that I get to enjoy my breakfast with him while having a short while of fun prior to leaving the house.
 
This is a very easy to prepare garlic bread recipe. You can use any bread or bun you have at home, it can be a day or two days old bun. Once oven-baked, it will turn soft again. The bun I used was the rye bun recipe shared here. I added in black sesame seeds (about 2tbsp) into the dough while kneading, and instead of walnuts, I used dried black apricot.

Slice the bun to about 1cm or 1.5cm thickness, brush the garlic butter (for recipe, see below) on each sides of the slices. Then assemble the slices back to its original form. Wrap with aluminium foil or parchment paper. Preheat the oven to 180deg C, bake for about 10min. Enjoy! If there are remaining garlic spread after spread on the bread slices, brush the balance spread on top of bun.


Recipe (garlic butter spread enough for 1 bun)
  • 1 small clove of garlic, minced with pinch of salt*
  • Pinch of salt and cracked black pepper
  • 1tbsp butter, melted
  • 1tbsp olive oil
*Mince the garlic with a pinch of salt, this way, it gets minced and turns into a paste easier and faster.


I'm linking this post to the event, Little Thumbs Up organised by Zoe of Bake for Happy Kids and Doreen of My Little Favourite DIY and hosted by Jozelyn Ng of Spice Up My Kitchen.

Thursday, June 5, 2014

Soft honey rye bun with walnuts

Eating home-baked bread makes you fat? Or NOT? Think again.


Recently, an online news has been circulating saying that making your own bread and eating it makes you fat. I shrugged it off with a grin. Certainly, many of you may be put off to bake your own bread reading this. But think again. Homebaked bread versus commercial bread. Good quality oil versus trans fat (which may clog your arteries and cause heart related diseases). Good quality molasses or honey versus white sugar. Organic rye flour versus plain white flour. Shelf life of 2 days versus 1 week or more. Think again.. which is healthier, which is not. It's all about the ingredients we use when baking our own bread. Instead of using plain white bread flour, try using wholemeal or rye flour. I have been baking my buns and loaves with rye flour a lot lately. Rye flour retains a large quantity of nutrients and fiber, in contract to refined wheat flour, making it a great choice for those who are wary of gaining weight from eating bread. Here are some of the good recipes for buns or oatmeal with rye:
 
Instead of using butter in my loaves or buns, I use good quality vegetable oil, either grapeseed oil or rice bran oil. The aroma may not be as great as those baked with butter, but I felt better (weighing scale wise) consuming it daily.
 
In addition to those shared above, this is another very good recipe for a soft and fluffy rye bun. Instead of sugar, I used honey which makes it soft and moist when kneading, and very fluffy when freshly baked, just be mindful when consuming. Over-consuming may still cause weight gain despite of the healthy ingredients used.
 
Here's the recipe:
 
First, prepare the scalded dough
  • 100g rye flour
  • 70g hot water
Combine both with a folk or spoon. There is no need to knead. Just combine and leave in a container in refrigerator while you prepare the rest of the ingredients (about 15-20min). You can prepare this ahead and keep in the fridge for up to 24hours. Add into the main dough when the main dough has kneaded for about 5min in the breadmaker (see step 2 below).


The main dough
*The ingredients are listed in the order they are added into my breadmaker
 
  • 50g (about 4tbsp) rice bran oil
  • 250g water
  • 3tbsp honey
  • pinch of salt
  • 1tbsp tahini  
  • 300g high protein flour
  • 100g all purpose flour
  • 3/4tsp baker's yeast (instant active dry)
  • 3tbsp walnut and pumpkin seeds (added in after 25min of kneading time in the breadmaker)

 
  1. I have kneaded the dough using the 'DOUGH' mode with my breadmaker.
  2. When all the ingredients has combined together, I add the scalded dough in pieces.
  3. After about 25min of kneading, I add in the walnuts and pumpkin seeds.
  4. The breadmaker would finish kneading and go through a proving phase (about an hour).
  5. Once it finishes its DOUGH mode, remove the dough from the breadmaker and punch it to remove trapped air.
  6. To make buns, divide the dough into 6-8 equal portions and smooth the dough to round bun shape. Let the dough proof for another 45min or until the dough doubles its original size. **I have always done this second proof in an oven (without turning it on).
  7. Brush top of loaf or buns with water and sprinkle with rolled oat.
  8. Once the loaf or buns are ready to be baked, preheat the oven to 165deg C, bake for about 20min.  


Monday, May 26, 2014

Charcoal bun with black sesame and fig 黑芝麻竹碳面包(无花果)


This charcoal bun recipe is very similar to the rye bun I baked a few days ago. I added bamboo charcoal powder to it, making it black in color, which creates a great contract when topped with either white sesame seeds or rolled oat. There are no taste to bamboo charcoal powder, but the buns still smell nice because of the rye flour used and the chopped dried fig imparts a very pleasant fruity sweetness and bite to it.
 
An occasional intake of bamboo charcoal is great for the body. Bamboo charcoal contains carbon, its negative ionic charge attracts positive ionic charges (of toxins and poisons) causing them to bind and then escorts them out of the body via the eliminative channel of the intestines. I might have eaten something dirty over the weekend which gave me bad bloating and flatulence, so I made this, hoping that it'll help relieve my poor tummy.
 
I have always baked my bread using an adapted and modified scalded dough method by Alex Goh which yield very soft and fluffy bread without adding any softener. It is easy and straight forward. You'll just need to scald 100g of bread flour with 70g of hot water, simply mix it with a spoon or folk, cover up, leave in chiller while you prepare the rest of the ingredients. When all the other ingredients are well combined and kneaded, add in the pre-prepared scalded flour and knead till evenly combined. The results are very worth the extra step taken. I have tried all sorts of method that claims to yield soft fluffy bread. This method, too, can produce bread with the same kind of fluffiness.
 
Here's the recipe
 
First, prepare the scalded dough
  • 100g rye flour
  • 70g hot water
Combine both with a folk or spoon. There is no need to knead. Just combine and leave in a container in refrigerator while you prepare the rest of the ingredients (about 15-20min). You can prepare this ahead and keep in the fridge for up to 24hours.


The main dough
*The ingredients are listed in the order they are added into my breadmaker
 
  • 40g (about 3tbsp) rice bran oil
  • 250g water
  • 2tbsp brown sugar
  • pinch of salt
  • 2tbsp black sesame powder
  • 1tbsp bamboo charcoal powder
  • 300g high protein flour
  • 100g all purpose flour
  • 1tsp baker's yeast (instant active dry)
  • 3 dried figs, chopped (added in after 25min of kneading time in the breadmaker)
 
  1. I have kneaded the dough using the 'DOUGH' mode with my breadmaker.
  2. When all the ingredients has combined together, I add the scalded dough in pieces.
  3. After about 25min of kneading, I add in the chopped dried fig.
  4. The breadmaker would finish kneading and go through a proving phase (about an hour).
  5. Once it finishes its DOUGH mode, remove the dough from the breadmaker and punch it to remove trapped air.
  6. To make buns, divide the dough into 8 equal round portions weighing about 100g each. Makeit round and smooth. Let the dough proof for another 45min or until the dough doubles its original size. **I have always done this second proof in an oven (without turning it on).
  7. Brush top of loaf or buns with water and sprinkle with rolled oat.
  8. Once the loaf or buns are ready to be baked, preheat the oven to 165deg C, bake for about 20min.

Monday, March 31, 2014

Sausage bun / Carrot and goji bread


Sausage versus carrot and goji - 一个被视为不大健康的,一个听到都知道是健康入骨的,两个在一起成了一个非常强烈的对比,味道又会是怎么样的呢? 
 
On Sunday, both hubby and I would go out for our 'usual' yam cha sessions in the afternoon and we'll indulge in something we usually don't. We had economy noodles at the market in Pasar Tanah Merah 石咀巴刹。They taste really good. In my opinion, they sell the best economy noodles 经济粉面 in Sandakan. I always wonder, how difficult is it to prepare fried noodles? Why is it that not all of them cook good-tasting ones? My phone was sent in to repair and maintenance, so I used my hubby's phone to snap some photos of the food and posted them on FB. A friend commented, 'Never imagined that you guys would eat these kind of food, knowing the nature of Jennifer's job'. Honestly, I don't think I was shocked to see these kind of comment. It's not the first, for sure. What do you guys think a nutritionist eat?
 
Yep, I don't eat sausage bun everyday, or probably not even once in 6months. And neither have I been eating or buying bread or buns from outside. I have shared about the reason a few post back and I better not re-emphasize that again, in case I get mistaken that I eat apple and oat all day long.  
 
I made this sausage bun, cos I wanted to have a change from the usual plain buns we've been eating. But sausage bun with white dough would be so plain, so I made it with a carrot and goji dough, don't you just love the golden color? Carrot and goji are both excellent foods that benefit the eye. The goji berry is among the highest source of carotenoids of all known common foods. Gojis contain 500 times the amount of vitamin C, by weight, than oranges About 11mg of iron per 100g can be found in the gojis.
 
The bread dough is the soft and fluffy milk bun dough that I've been using all this while. It does involve an extra step of preparing the starter dough, but the results of the bun or bread is sooo much worth it. I have stopped trying out other bread recipe, even though claimed very soft and fluffy, cos to me, I have already found 'the recipe' for my soft and fluffy bread. It was originally a recipe by Alex Goh, but I have adapted it very much making it my own recipe which works well either kneaded by hand or breadmaker. I have kneaded this dough using my faithful Donlim breadmaker.
 
Starter dough
  • 100g bread flour
  • 70g boiling water
To prepare the starter dough, pour boiling water over flour and stir with folk until combined to a slightly tacky dough. Cover and chill in the refrigerator. Keep for 20min before use, can keep up to 12hrs in refrigerator
 
Main dough (the ingredients are placed in the breadmaker according to the order they are listed):
  • 3tbsp rice bran oil*
  • 150g carrot and goji berry puree (prepared by steaming and pureeing 1 carrot and 1tbsp goji)
  • 100g fresh milk
  • 2tbsp dark muscovado sugar
  • pinch of salt
  • 300g bread flour
  • 100g all purpose flour
  • 2tsp active dry yeast  
*Other than grapeseed oil, rice bran oil is also a healthy baking oil. It is the oil extracted from the germ and inner husk of rice. It is notable for its high smoke point of 232 °C (450 °F) and its mild flavor, making it suitable for high-temperature cooking methods such as stir frying and deep frying.
 
1. Add all the ingredients (in the order listed above, except for the scalded dough) in breadpan.
2. Select mode no. 7 (dough 发面). Press START.
3. When the ingredients have combined together, about 3min into kneading, add in the scalded dough by pieces.
4. After 1hr 30min, a beep alert will sound indicating that the dough is ready.
5. Remove the dough from the breadmaker.
6. On a floured surface, punch the dough to remove trapped air. Knead a few times. Form about 130g portion of dough into ball shape. Using a rolling pin, flatten into an oblong disk and roll up to form a rope shape. Roll up around the frankfurter. Brush top of bun with milk/ water or beaten egg wash, sprinkle with black and white sesame seeds.
7. Place the bun in an enclosed oven (temperature not switched on) for a second rise, about 45min, or until the buns double or at least 1.5x their original size.
8. Preheat the oven to 170deg C. Bake the buns for about 15-20min.
 
 
Attaching a photo of myself, indulging in my sausage and carrot goji bun. Happy Monday :)


Sunday, March 30, 2014

Black sesame bun with sunflower seeds

I found the perfect bread for my organic peanut butter!! It's this black sesame bread! The nice nuttiness from this black sesame bun topped with sunflower seeds seems to be the perfect bread that matches nicely with my creamy organic peanut butter. I actually mix together the peanut butter with white tahini so I get lots of the omega goodness while I indulge in something that tastes so good!
 
This black sesame bread recipe is a recipe I worked out by accident. I was supposed to use my normal soy milk bun recipe for this, but my weighing scale was dirty and I had no time to wash it before I could weigh out my liquid ingredients, so I just put in one cup of the black sesame cereal milk into this recipe and the bun turned out 'oh! so fluffy!'. This dough was kneaded using my breadmaker. Its hydration level is very high. First, I'm not sure if it works kneading by hand, I have a feeling it's gonna be very messy (or sticky), and secondly, I'm not sure if it works on other breadmaker. Try it at your own risk, but the results are worth it.


Instead of using black sesame powder (which you can obtain simply by grinding toasted black sesame seeds), I used a sachet black sesame cereal drink powder (see photo below). I made up the black sesame drink with a cup of warm water and chilled it slightly before using it in this recipe. This drink is made up of black soya, black sesame, black rice, walnut, blackcurrants, pine nuts, black mu-er 黑木耳 and 何首乌。 I felt that drinking this drink is better than drinking black sesame alone, cos there are a multitude of other antioxidants and nutrients available from other iron-rich grains, seeds and nuts. Black soya, black mu-er and 何首乌 are also great for hair health. I have also used it to bake my favorite chiffon cupcakes recipe for my MIL's birthday.


Here's the recipe adapted from Alex Goh's scalded dough method

Scalded dough/ starter dough
·         100g bread flour
·         70g boiling water

To prepare the starter dough, pour boiling hot water over flour and stir with folk until combined into a slightly tacky dough. Cover and chill in the refrigerator. Chill for 20min before use, can keep up to 12hours in refrigerator.

Main dough
  • 2tbsp grapeseed oil
  • 1cup of black sesame cereal drink (made with 1 sachet in 1 cup of warm water), chilled before use
  • 2.5tbsp brown sugar or dark muscovado sugar
  • 1/2 tsp salt
  • 200g bread flour (hi protein flour)
  • 50g all purpose flour
  • 3/4 tsp instant active dry yeast

* about 2-3 tbsp. raw, untoasted, organic sunflower seeds.
 

1.       Remove the breadpan from the bread machine. Fit in the kneading blade.
2.       Add all the ingredients in the order listed above, except for the scalded dough prepared earlier.
3.       Insert and lock the breadpan into the bread machine.
4.       Select mode no. 7 (dough)* the display panel will display defaulted time of 01:30 (1hr30min). Press start.
5.       When all the ingredients has combined together (about 5min), add in the starter dough in small pieces.  
6.       After 1 hour 30min, a beep alert will sound indicating that the dough is ready.
7.       Remove the dough from the bread maker.
8.       On a floured surface, punch the dough a few times to remove trapped air. Knead and throw a few times. Let rest for about 5min, then form about 150-200g portion of dough into ball shape. (Cover your palms with vegetable oil if you find the dough is too sticky to knead or shape)
9.   Repeat with the rest of the ball.
10.   Brush the top of buns with beaten egg wash and sprinkle generously with sunflower seeds.
11.   Cover buns with damp cloth or cling film (or in the oven) and proof for the second time for about 45min, or until double in size.
12.   Preheat the oven to 175deg C. Bake the buns for about 15-20min.


Wednesday, March 26, 2014

Prune and honey braided bread roll

I have once again baked a bread roll with Alex Goh's scalded dough method adapted to my breadmaker Donlim DJH10X. This is a great recipe if you have elderly or kids at home and you don’t intend to add too much sugar into your loaves or buns. The addition of prune paste makes it naturally sweet. It also gives it a great rustic appearance. The texture of this bread roll is a little coarse, not so smooth, due to the usage of 10-grain flour in this recipe.  This bread roll has high very fiber and its prune content makes it great for those with constipation.


Scalded dough/ starter dough

·         100g bread flour
·         70g boiling water
To prepare the starter dough, pour boiling hot water over flour and stir with folk until combined into a slightly tacky dough. Cover and chill in the refrigerator. Chill for 20min before use, can keep up to 12hours in refrigerator.

Main dough

·         40g grapeseed oil or vegetable oil
·         160g water
·         100g prune puree (soak prunes in hot water for 20min, then blend till smooth)
·         2tbsp black soymilk powder
·         1tbsp honey
·         Pinch of salt
·         300g bread flour
·         100g 10-grain flour
·         1tsp instant active dry yeast

1.       Remove the breadpan from the bread machine. Fit in the kneading blade.
2.       Add all the ingredients in the order listed above, except for the scalded dough prepared earlier.
3.       Insert and lock the breadpan into the bread machine.
4.       Select mode no. 7 (dough)* the display panel will display defaulted time of 01:30 (1hr30min). Press start.
5.       When all the ingredients has combined together (about 5min), add in the starter dough in small pieces.  
6.       After 1 hour 30min, a beep alert will sound indicating that the dough is ready.
7.       Remove the dough from the bread maker.
8.       On a floured surface, punch the dough a few times to remove trapped air. Knead and throw a few times. Let rest for about 5min, then form about 70g portion of dough into ball shape (this recipe makes 12 small balls weighing about 60-70g each).
9.       Roll each small ball of dough into a rope shape. With the three ropes lined up, braid loosely just like how you’ll braid your daughter’s hair J. Tuck both end underneath.  
10.   Repeat with the rest of the ball.
11.   Brush the top of braided rolls with beaten egg wash and sprinkle with rolled oat.
12.   Cover braided rolls with damp cloth or cling film (or in the oven) and proof for the second time for about 45min, or until double in size.
13.   Preheat the oven to 175deg C. Bake the rose buns for about 15-20min.


Related Posts Plugin for WordPress, Blogger...