Thursday, August 14, 2014

Coffee chiffon cake (scalded dough/ cooked flour method)


Here's the lil' fella and my mom enjoying their chiffon cakes for breakfast. 

Yea, it's chiffon cake again. I love to bake and eat chiffon cakes. It's so light and feels much 'healthier'. It is still delicious even though I cut the sugar by quite a lot. And best of all, it's the only kind of cake that everyone in the family loves (even my MIL who doesn't eat cakes loves eating my chiffon cake) and it gets eaten up in a few hours, so I have no problem of leftover or food wastage. 

Even though this is called Coffee Chiffon Cake and made using the 3-in-1 instant coffee sachet, but it is not that intense in terms of its coffee flavor. Instead, the aroma of dark muscovado sugar 黑砂糖 is more pronounced. 

This is a recipe that I've been using a lot lately, just used the same recipe to bake Orange and Mango Chiffon few days ago. I like it cos it doesn't use a lot of egg (my hubby had been wondering why the eggs get used up so fast... :p) and it fits my 18cm chiffon tube pan just right. 

Here's the recipe, adapted from Happy Home Baker. 

Ingredients:(I used an 18cm chiffon pan)

4 egg yolks (medium)
2tbsp dark muscovado sugar
3tbsp rice bran oil
90g coffee made up with 3-in-1 coffee sachet
80g cake flour (I actually used 65g all purpose flour and 15g corn flour)

4 egg whites (medium)
3tbsp dark muscovado sugar


Instructions:
  1. Sieve cake flour and set aside. 
  2. Combine rice bran oil with coffee. Heat up to simmering in a pan. Remove from heat. Add in sifted flour. Add into egg yolk mix. Whisk to combine. Leave in fridge to chill. 
  3. In a clean, dry mixing bowl, beat egg whites with a handheld electric mixer on low speed until mixture becomes frothy and foamy.  Add half of the sugar amount and turn to high speed and beat the mixture. Continue to add in the remaining sugar and beat until the egg whites reaches the soft peak stage.The soft peak stage is reached when the peaks of the whites curl over and droop slightly. The egg whites should appear smooth and glossy, and if you overturn the bowl, the egg white meringue doesn't drop.
  4. Add the beaten egg whites into the egg yolk batter in 3 separate additions, each time folding gently with a spatula until just blended.
  5. Pour batter into a 18cm tube pan (do not grease the pan). Tap the pan lightly on a table top to get rid of any trapped air bubbles in the batter.
  6. Bake in pre-heated oven at 140 degC for 40 mins (every oven differs, my oven has been a very friendly one, after about 20min in the oven, I had to tent an alum foil loosely oven the chiffon to avoid the top from getting too brown), bake until a toothpick inserted into the centre comes out clean, when lightly pressed the cake will spring back. Invert the pan immediately and let cool completely before unmould (I usually wait for at least an hour before I unmould the cake from the pan).  
Here's a youtube video link on how I unmould the chiffon cake from its pan. This is the part I love the most about baking chiffon cake, aside than eating it. 


This post is linked to the event Little Thumbs Up (August 2014 Event: Flour) - organised by Zoe (Bake for Happy Kids) and Mui Mui (My Little Favourite DIY) and hosted by Diana from Domestic Goddess Wannabe.


Tuesday, August 12, 2014

Japanese milk tea bun with raisin & cinnamon sugar


Here's a very beautiful yet soft and fluffy Japanese milk tea bun with very generous amount of raisin. I replaced the liquid in this recipe with Japanese milk tea (as in photo). I have also replaced the sugar in this recipe with cinnamon sugar (made up with 1:1 ratio of brown sugar and cinnamon powder). The bun turns out smelling very fragrant and soft. A friend of mine A whom had this wasn't sure if her son would like it due to the alien spice (ie cinnamon) in it, the next morning she called me up and told me that her son loved it! Made my day :) 

Take more cinnamon. It's great. Cinnamon may help lowers risk for diabetes. It also helps fight against fungal and bacterial infection. Some researchers had also done research which revealed that diets rich in cinnamon can help reduce the body's negative responses to eating high-fat meals (Source). 

Here's the recipe 

Prepare scalded dough
  • 100g bread flour (Hi protein flour) 
  • 70g hot water 
Combine both in a bowl. Stir with a chopstick or folk to ensure both combine thoroughly. Cover and keep in fridge for about 15-25min. 

Prepare the main dough (I kneaded this in my breadmaker
  • 3tbsp rice bran oil 
  • 250g Japanese milk tea (made up with one sachet) 
  • 2tbsp cinnamon sugar (made up with 1tbsp brown sugar and 1tbsp of cinnamon powder) 
  • pinch of salt 
  • 300g bread flour (Hi protein flour) 
  • 100g all purpose flour (plain flour) 
  • 1tsp instant active dry yeast 
4tbsp raisins, chopped
2tbsp butter, melted with 1tsp cinnamon powder and 1tbsp brown sugar  
  1. Add all the ingredients (in the order listed above) in bread pan, except for scalded dough and raisins and butter. 
  2. Select mode for dough 发面。 The display panel will display defaulted time of 1hr30min. Press start. 
  3. When the ingredients have combined together (about 3min) add in the scalded dough by pieces. 
  4. After 1hr30min, the breadmaker will beep to indicate that the dough is ready. 
  5. Remove the dough from the breadmaker. 
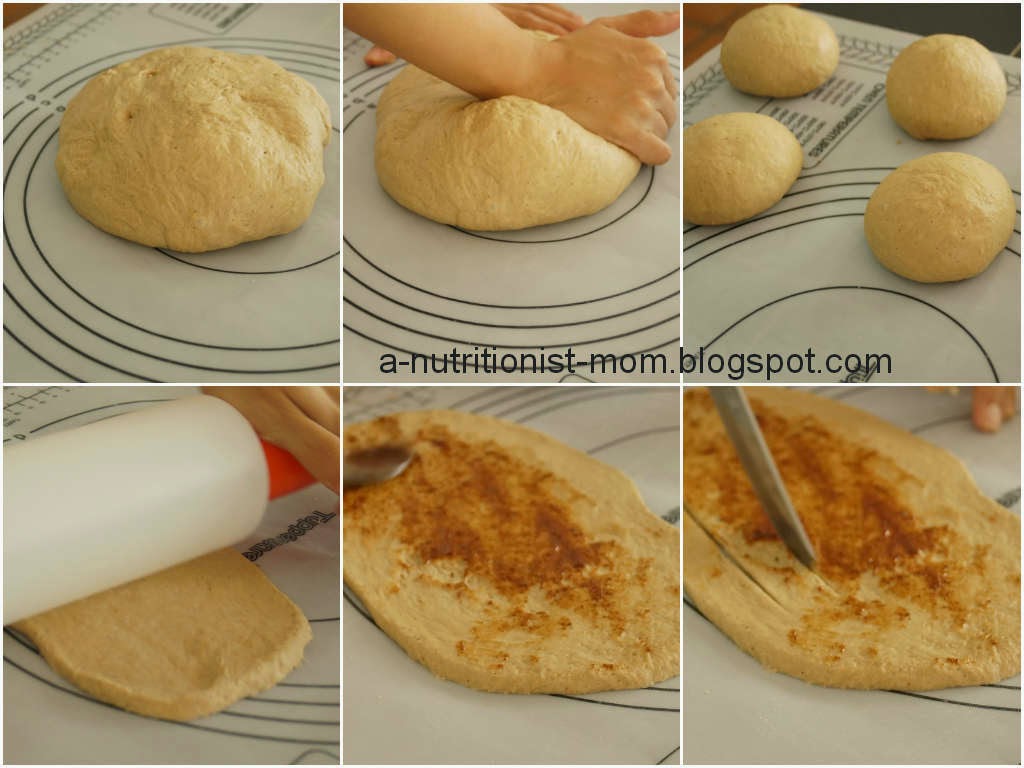
  6. On a floured surface, punch the dough to remove trapped air. Knead and throw a few times. Divide into 6 equal portions weighing about 130-150g each. 
  7. With a rolling pin, flatten the portioned dough into a flat oval disk. Spread 1tsp of butter-cinnamon spread on the disk. Sprinkle with chopped raisins. Cut the flat disk into 4-5 strips but leaving one end intact (not cut). Roll up the entire strip disk to form a long twig. Twist one end, 3-4 times, and form the twisted twig into coil. Place the bun on a baking tray. Repeat with the remaining portioned dough. See my facebook link for a short video clip on this step. https://www.facebook.com/photo.php?v=10154491536890352&set=vb.577660351&type=2&theater&notif_t=like 
  8. Brush top of bun with water. Sprinkle with more cinnamon sugar. Let rise until the bun double their original size (takes about 30-45min). 
  9. Preheat the oven to 170deg C. Bake the buns for about 18-20min. 


The last 2 steps are re-illustrated using table cloth in the following diagram. 


This post is linked to the event Little Thumbs Up (August 2014 Event: Flour) - organised by Zoe (Bake for Happy Kids) and Mui Mui (My Little Favourite DIY) and hosted by Diana from Domestic Goddess Wannabe.


Black sesame and oat mantou (steamed bun)


Here's the recipe

Recipe modified and translated from Carol.

*old dough 100g (see following for preparation of old dough) *I did this step too, according to her, it improves the fragrance and texture to great extent. But I had to leave mine in room temperature for about 3hours for it to double its size. It didn't proof when in the fridge.
*300g Cake flour/  superfine flour (I didn't have cake flour at home. Instead, I used 270g all purpose flour with 2tbsp corn flour)
*1.5tbsp black sesame powder
*1tsp Instant active yeast
*100g fresh milk (lukewarm) 
*3tbsp rolled oat in 50g fresh milk (soaked for at least 15min)  
*30g Brown sugar
*1/8tsp Salt
*50g Rice Bran Oil

Preparation of old dough
*120g all purpose flour 
*1/2 tsp instant active yeast 
*80g warm water  
*pinch of salt 

  1. Place all ingredients in a bowl and knead till it becomes a smooth dough (about a few minutes, max). 
  2. Cover bowl with cling film and let proof for 6-8hours under room temperature, or let proof in fridge until the next day.  
  • Old dough that is not used up can be kept in the fridge for 3-5 days or in the freezer for at least 1 month. Thaw before use. 
 Instructions:
1. Combine all ingredients and knead. I used my Donlim breadmaker to knead. Knead until the dough is stretchy and has smooth surface (about 10min in my bread machine).
2. Leave to proof in an oiled bowl till it double its size. (i did this in the bread machine using the Proofing mode, about an hour)  
3. On a floured surface, punch the risen dough to knock out all the trapped gas.
4. Using a rolling pin, roll into a thin flat dough. Roll up like rolling up a swiss roll  
5. Cut into 10 equal pieces. (I made some into bun some, since he loves the round bun)
7. Place onto non-stick parchment paper.
8. Let proof for another 30-40min.
9. Steam in vigorously boiling water for about 12min. Wrap the lid with a tea towel to prevent the condensate from dropping back onto the pau, which will uglify the outlook. Do not open the lid right away. Let cool gently so that the skin of the pau wont turn wrinkly.


Monday, August 11, 2014

Wholemeal bun with raisins (straight dough) / Why bake your own bread?


Last Satuday, I had a bake-a-bread class at my organic shop Just Health. More and more people resort to baking their own loaves at home these days. The compelling reason was mostly heath-related. During the class, I also made extra effort to educate the clients on the 'not-so-healthy' stuffs that are used in baking commercial bread, including 
  • shortening / trans-fat (a cheap alternative to butter or plant oil, but carry the risks of clogging the arteries. The FDA had once mentioned that trans fat is a unique powerful promoter of heart disease. So ditch those margarine from your kitchen. They are not easily metabolized or digested, thus may accumulate in our body, causing further harmful effects on our liver).
  • bread improver (which consists of a variety of chemicals, including azodicarbonamide ADA, a type of chemical used to make yoga mat or base of our shoe. When used in baking bread, it allows bread to raise higher, stay soft for longer period of time and form an attractive looking crust. Prolonged exposure of this additive may cause asthma or skin sensitization).  
  • bleaching agent used to turn flour white (when the flour is bleached it produces alloxan. Alloxan is a poison that is used to produce diabetes in healthy experimental animals (primarily rats and mice), so that researchers can then study diabetes “treatments” in the lab. There is no other commercial application for alloxan, because it is so highly toxic) - here's the primary reason why I woud encourage you all to use unbleached flour to bake your bread. Unbleached flour are commonly found in premium supermarket or organic shops in Malaysia. 


Here' the recipe for this nice, soft and fluffy wholemeal bun. It's a straight dough recipe, unlike the normal scalded dough recipe that I always do. But it yielded very fluffy bun which was still good the next morning. I adapted this recipe from a fellow blogger, unfortunately, I copied the recipe and forgot whom I got it from. 

Recipe makes 10 buns
*I kneaded and proved the dough using my trusted Donlim breadmaker.  
  • 2tbsp rice bran oil 
  • 350ml water 
  • 1tsp salt 
  • 3tbsp molasses sugar 
  • 450g bread flour (Hi-protein) 
  • 100g plain flour / all purpose flour 
  • 50g wholemel flour (Hi-protein) 
  • 3tsp instant active dry yeast 

  • 2tbsp raisins & 4 black apricot, chopped (organic)
Instructions 
1. Add all the ingrediens (in the order listed above) in breadpan, except raisins and apicots.  
2. Select mode for dough 发面. Press start. When the dough has kneaded for about 25min, add in raisins and chopped apricots.
3. After 1hr30min, the breadmaker will beep indicating that the dough is ready. Remove dough from breadmaker.
4. On a floured surface, punch the dough to remove trapped air. Knead afe times. Divide into 10 buns and form into ball shape. Brush top of buns with water and sprinkle with white sesame seeds (optional).
5. Place the bun in the oven for second rise until the buns double their original size (about 45-60min).
6. Preheat oven to 170degC, bake the buns for 18-20min.

This post is linked to the event Little Thumbs Up (August 2014 Event: Flour) - organised by Zoe (Bake for Happy Kids) and Mui Mui (My Little Favourite DIY) and hosted by Diana from Domestic Goddess Wannabe.


Sunday, August 10, 2014

Pasta with creamy mushroom and oat sauce (5 ingredients pasta sauce)


The happy lil' fella :)

Aside than the creamy tomato and pumpkin sauce, this is my favorite pasta sauce that I always make for the lil' fella. It's easy to prepare with just a few simple ingredients and it is yummy especially when served with shaved parmesan or just grated cheese. Sometimes, I add more milk or water to it, and turn it into a soup, served with toast. I have also used it as sauce for pasta bake. Very versatile indeed. I don't add salt into it, still standing firm that his food shall not need to be seasoned with salt, before he reaches two year old. The garlic and onion gives it the mild savory note. Of course, the final addition of cheese (but it's optional) makes it yummilicious!

I have made this sauce with potato and mushroom. This time, I added in rolled oat instead of potato. The addition of rolled oat makes it thicker and creamier without the need of adding in flour. It also boost up its nutrition count and dietary fiber content.

All you need for this creamy and healthy pasta sauce are:
  • 3tbsp rolled oat soaked in half cup of full cream fresh milk
  • 1 cup of water or stock
  • 5 - 7 fresh brown button mushrooms, cleaned and chopped
  • 2 cloves garlic, finely minced
  • Half an onion, finely minced
Instructions:
  1. Heat up 1-2 tbsp cooking oil (I used rice bran oil) in a heated frying pan. Stir in minced garlic and onion till onion turns translucent. Stir in chopped mushrooms. Cook until mushrooms sweat.
  2. Add in rolled oat with the soaking milk and water or stock.
  3. Simmer on low heat for about 10-15min or until the mushrooms turn soft. Season with pepper and salt (optional).
  4. In a food processor or blender, blitz the sauce till creamy. Serve with cooked pasta sprinkled with shaved parmesan or grated cheddar.
Options:
  • Serve with cooked vegetables eg broccoli, carrot or sweetcorn that is pre-cooked in another pot of boiling water or steam-cooked.
  • This sauce is suitable for freezing for 2-3 weeks. Prior to serving, thaw in refrigerator and heat till piping hot.


Saturday, August 9, 2014

Orange & mango chiffon cake

Somehow, today didn't feel like a Saturday. Time seems to fly by so quickly these days. I had a class at Just Health today to teach the new Donlim breadmaker clients on their new machines. After the class, I went home and baked my favorite 'tang mian' (scalded dough) chiffon cake so that mom can try it. Mom loved it. The lil' fella loved it too.


This is adapted from a chiffon cake recipe that I tried out sometime back, but this round, I turned it into a 'cooked dough' (tang mian) version. It turned out fantasticly soft, in fact, a little on the moist side. I actually love my chiffon to be a little moist, it seems to give that 'melt-in-your-mouth' sensation.

Here's the recipe, adapted from Happy Home Baker. 

Ingredients:(I used an 18cm chiffon pan)

4 egg yolks (medium)
2.5tbsp dark muscovado sugar
3tbsp rice bran oil
90g freshly squeezed orange juice
80g cake flour (I actually used 65g all purpose flour and 15g corn flour)

4 egg whites (medium)
3tbsp dark muscovado sugar

60g chopped mango


Instructions:
  1. Sieve cake flour and set aside. 
  2. Combine rice bran oil with freshly squeezed orange juice. Heat up to simmering in a pan. Remove from heat. Add in sifted flour. Add into egg yolk mix. Whisk to combine.
  3. In a clean, dry mixing bowl, beat egg whites with a handheld electric mixer on low speed until mixture becomes frothy and foamy.  Add half of the sugar amount and turn to high speed and beat the mixture. Continue to add in the remaining sugar and beat until the egg whites reaches the soft peak stage.The soft peak stage is reached when the peaks of the whites curl over and droop slightly. The egg whites should appear smooth and glossy, and if you overturn the bowl, the egg white meringue doesn't drop.
  4. Add the beaten egg whites into the egg yolk batter in 3 separate additions, each time folding gently with a spatula until just blended.
  5. Add in the chopped mango.  
  6. Pour batter into a 18cm tube pan (do not grease the pan). Tap the pan lightly on a table top to get rid of any trapped air bubbles in the batter.
  7. Bake in pre-heated oven at 140 degC for 40 mins (every oven differs, my oven has been a very friendly one, after about 20min in the oven, I had to tent an alum foil loosely oven the chiffon to avoid the top from getting too brown), bake until a toothpick inserted into the centre comes out clean, when lightly pressed the cake will spring back. Invert the pan immediately and let cool completely before unmould (I usually wait for at least an hour before I unmould the cake from the pan).  


Yep, this is me letting my clients know why it is now more important to bake our own bread rather than buying from outside.


For enquiry related to the breadmaker that I sell at Just Health, please email justhealthsandakan@gmail.com


Wednesday, August 6, 2014

Fried charcoal noodle with dried shrimp


Ermmm.... now.. how should I start.. I haven't been blogging properly for the longest time ever, so many things had happened, and I have no idea how I should summarize all in one short blog post. Okay.. most things that happened are good stuffs... so it's worth a mention.. let me do them in point form:

* I have finally bidded good-bye to my Samsung S2 which I've been using for 21month (I remember the date clearly, cos it was a pre-give-birth pressie from my dad) and gotten myself a mi3 (aka xiaomi) which I'm quite happy with 

* We have also bidded good-bye to TM internet and treated ourselves with Yes 4G which should allow me to enjoy 5x the speed of the conventional 3G. Fingers crossed it would :) 

* I made a business trip to Korea for a week and left the lil' fella at home with the hubby. The hubby managed it fantastically, and life went on normal (more than normal.. according to hubby, the lil' fella behaved better without me around :~ ) when I weren't around. I aint sure if I should be happy or not knowing this. Hahahaaa... but one thing I'm sure, I can plan more biz trip or girls trip in the future. LOL.

* The lil' fella has much more vocab now. He knows majority of the animals he sees on the animal video or the animal book, crocodile, monkey are his favorite. He somehow is fearful of gerbil but he's okay with guinea pig. He also started saying 一二三 in Mandarin and one, two, three, four, five in English. And I haven't properly taught him that. He could have picked them up elsewhere.

* I am back to zumba-ing.

* I have been addicted to instagram-ing. Not that I'm instagram-ing, but I am addicted to checking out beautiful posts on other people's instagram.

* I finally settled my car loan of 7 years. So my suzuki swift is now all mine :D

* My brother is leaving for Japan for further studies in September. We are all proud and happy about it, cos it gives all of us one more destination to fly to in the future. In fact we were already planning the trip to Japan way before he was confirmed with the uni-acceptance and scholarship. LOL  

* Mom's back in Sandakan, which I'm super chuff off, she hasn't been back here for over half a year. This fried charcoal noodle brekkie was made by her. Somehow it tastes much more delicious than the ones I make.

See?... you know what I meant by so many things had happened in such short time? There are more.. but I better stop here. I shall share on the recipe for this simple yet delicious fried charcoal noodle with dried shrimp (I still think the reason it's delicious is because it's made by my mom.. you know how all of us always miss mom's cooking?) 

Recipe (serves 4 adults and 1 baby)
*1tbsp dried shrimp (soaked in water till soft and chopped finely) 
*3 clove garlic, minced
*Half an onion, thinly sliced 
*Half a carrot, julienned 
*Half a zucchini, julienned 
*Few cabbage leaves, julienned 
*Charcoal noodle, cooked in boiling water till soft

 Instructions:
1. Heat up 1-2tbsp rice bran oil in a heated wok. Fry half of the minced garlic, onion and dried shrimp till fragrant. Stir in and stir fry the charcoal noodle for about 3-5min. Set aside.
2. In a clean wok, heat up a tbsp rice bran oil. Stir fry remaining garlic, carrot, zucchini and cabbage until veg turns soft. Stir in fried noodles. Season with Bragg's liquid amino and salt.


Related Posts Plugin for WordPress, Blogger...