Monday, June 30, 2014

Mango yogurt chiffon cake with dried fig


It was our favorite day- Sunday again.

It's been a busy week for both myself and the lil' fella as we had lots of visitors from KL. He had lots of fun just playing and 'talking' with his friends (he called Goh Goh Jie Jie) and I brought them to all the places of interests in Sandakan. They left on Saturday. So this Sunday, we get to rest and recuperate. The lil' fella took a long deserved nap of about 3 hours. With that, I get to bake my favorite Sunday's bake - chiffon and prep his lunch.

Today I have decided to bake a mango yogurt chiffon with chopped dried fig. I love the way the figs give the extra bite and texture to this soft and fluffy chiffon. Figs are good sources of calcium and they aren't as sweet as raisins nor dried cranberries. I coated them with half teaspoon of cake flour, so that they will not all sink to the bottom of the cake when baking.

Here's the recipe, adapted from Happy Home Baker. 

Ingredients:(I used an 18cm chiffon pan)

4 egg yolks (medium)
2.5tbsp brown sugar
3tbsp rice bran oil
40g plain yoghurt
50g mango puree
1 teaspoon lemon juice
80g cake flour

4 egg whites (medium)
3tbsp brown sugar

60g chopped dried fig
1/2 tsp cake flour for dusting

Instructions:
  1. Sieve cake flour and set aside. 
  2. Chop dried figs into small cubes. Coat with flour and sieve to remove excess flour. Set aside.
  3. Place egg yolks in a mixing bowl. With a manual hand whisk, whisk the yolks a little. Add in sugar and whisk to combine.
  4. Add in rice bran oil gradually, whisk to combine. 
  5. Combine mango puree, yoghurt and lemon juice. Add into egg yolk mix. Whisk to combine. Sieve over the flour and whisk till the flour is fully incorporated. Do not over mix. Set aside.
  6. In a clean, dry mixing bowl, beat egg whites with a handheld electric mixer on low speed until mixture becomes frothy and foamy.  Add half of the sugar amount and turn to high speed and beat the mixture. Continue to add in the remaining sugar and beat until the egg whites reaches the soft peak stage.The soft peak stage is reached when the peaks of the whites curl over and droop slightly. The egg whites should appear smooth and glossy, and if you overturn the bowl, the egg white meringue doesn't drop.
  7. Add the beaten egg whites into the egg yolk batter in 3 separate additions, each time folding gently with a spatula until just blended.
  8. Add in the prepared dried fig. Fold in until just blended Do not over mix.
  9. Pour batter into a 18cm tube pan (do not grease the pan). Tap the pan lightly on a table top to get rid of any trapped air bubbles in the batter.
  10. Bake in pre-heated oven at 140 degC for 40 mins (every oven differs, my oven has been a very friendly one, after about 20min in the oven, I had to tent an alum foil loosely oven the chiffon to avoid the top from getting too brown), bake until a toothpick inserted into the centre comes out clean, when lightly pressed the cake will spring back. Invert the pan immediately and let cool completely before unmould (I usually wait for at least an hour before I unmould the cake from the pan).  
See the following video to check out how I unmould the chiffon from the pan (Pardon my lil' fella. He just got up from his nap and must be starving).

Tuesday, June 24, 2014

Wholemeal croissant


This is gonna be a busy week for me. I have some friends with babies visiting from KL. I’ll be bringing them around Sandakan, checking out the orang utans, proboscis monkey (my son would love seeing them, he calls them ma-rao), crocodile and bears. Lucky that we have quite a lot of these in Sandakan. I’m sure both my son and I will have an excited week ahead.

The gang will be arriving late afternoon today and tomorrow. Thinking of making something for their tea later on today. Should I make them some nice, buttery, flaky croissants? But I haven’t made them for years. And the last attempt didn’t turn out perfect. Or should I just make them some of my usual cupcakes or buns? Me, knowing myself, I would definitely challenge myself in making the croissants. Who am I, if I’m not up for a simple challenge?


Tada!! The wholemeal croissants turned out ‘perfect’ .. or not so. I rated them 7 out of 10. They still don’t look that ‘perfectly’ pretty. But since they are ‘home-made’, I’m sure I’ll be pardoned. Taste and texture wise, GREAT!! Lovely buttery aroma lingers on even hours after they are baked. The thing I love about this recipe, it’s not that tedious compared to the usual croissant recipe, yet still turn out tasting awesome (it only took me about 3hours from start till finish)! That’s why I’ve been trying out quite a lot of recipe from Vic’s blog. So far, most of the recipes I’ve tried out from her blog turned out good. I’ve made some modifications to mine by replacing some of the plain white bread flour with wholemeal flour, so I don’t feel that gush of guilt eating these buttery morsels. Instead of pastry margarine as recommended by the recipe, I still insist that I use real butter. If you’ve been following me or my blog, you know that I’ve banned all sorts of trans-fat ingredients or food. But I knew that croissants with butter would be much harder to work with if compared to that using pastry margarine, due to the weather here. I would just have to give my best.

They said no one make perfect croissant on their first attempt. It needs lots of practice, patience and dedication. I’m only afraid that by the time I get there making the best croissant ever, my waistline would get super out-of-shape. Anyway, no one talks about ‘waistline’ when comes to good food. My favorite quirky filling for my wholemeal croissant is peanut butter and sliced banana (.. don’t give me that rolling eyes). What’s yours?

Recipe adapted from Victoria Bakes, further adapted from Alex Goh’s The World of Bread

  • 45g butter, softened (I used grapeseed oil)
  • 180ml cold water
  • 1tbsp soy milk powder
  • 1tsp salt
  • 2tbsp brown sugar
  • 150g bread flour
  • 60g wholemeal flour
  • 90g all purpose flour
  • 2tsp instant active dry yeast

  • 120g unsalted butter, left in freezer for 30min

Instructions
    1. Grate frozen butter with a cheese grater onto a piece of cling film and form into a square block, measuring about 15cmx15cm. Chill in refrigerator.
    2. Prepare dough by kneading all ingredients. I kneaded the dough using my Donlim breadmaker for 20minutes. All the ingredients are added in based on the order they are listed above.
    3. Roll dough out into a square, measuring about 30cmx30cm, wrap with cling film, and chill for 1 hour.
    4. Remove dough and butter block from frige. Place butter block in the middle of dough, and pull 4 corners of dough together to wrap the butter in the middle, seal the seams.
    5. Gently flatten the dough with my palm, using the rolling pin, roll dough out into a long rectangle till it is 1cm in thickness. Fold out in thirds like an envelope, turn dough 90 degree, and repeat the same process once more.
    6. Wrap dough with cling film and chill for 30 minutes.
    7. Remove chilled dough. Dust the tabletop with bread flour. Repeat the above process (Step 5) once more and chill dough for another 30 minutes.
    8. Remove dough from fridge, and roll it out to 5mm thickness (mine was about 10mm thickness, I couldn’t roll it any thinner or the butter would be oozing out), cut triangles (with base width measuring about 5cm and length measuring about 5-7cm), roll and shape into croissant.
    9. Prove croissants in oven for an hour.
    10. 15 minutes before the hour, remove croissants from the oven. Preheat oven to 170degC (for my Khind oven), brush with egg wash and sprinkle with topping (optional).
    11. Bake for about 18-20 minutes or until croissants turn golden brown.

*I made 13 croissants using this recipe


Friday, June 20, 2014

Toddler pretend play 1 - Let's go travelling!

Toddlers are sponges - learning and growing from each exposure. How did my 19month old knew what to do or what to say when we played this imagine play of let's go travelling? It was all by exposure. He was quick. I put on his backpack and sticked his teddy on his backpack. He lugged his suitcase. I waved him goodbye, he said 'Bye', and walked towards the door. I reminded him, don't forget to wear your shoes, Josh Josh. He then stopped and went for his shoes at the shoe-rack.
 
Pretend play is not just about imagination, but it's something that boosts learning and development. Pretend play teaches (resources from whattoexpect.com):
  • Empathy (he puts himself in someone's shoes, this time, he's someone who's going to board the plane)
  • Language skills (he engages in a two way communication with me, saying Bye in return)
  • Problem solving (the little brain is constantly thinking and imagining the scenes in her head. What does he need to do to get down the stairs when lugging a suitcase? or to open the door? Note to parent: Try not to get too involved. Let his imagination run, and you're just the supporting role in the scene)
  • Courage (pretend play is a safe way for little kids to work out their feelings in a safe environment)
Pretend play is also called symbolic play, it helps develop the ability to think symbolically, and that is essential to learning math and language.

He enjoyed it very much. He stepped out of the house and rode on his 'suitcase' and was having some fun time 'out' there while I prepped myself for his next game.

 
This time, I made sure I kissed him farewell.
 
MOM: Josh.. are you.. J: Mom, I'm busy! >.<


Suggestions for other pretend play themes:
  • Let's go picnic (bring out the rug, water bottle, the teddy, and some picnic snacks)
  • Dinner in a restaurant
  • Beach
  • A visit to the doc
 
Any others that you can think of for a toddler aged 18-36month old?


My first egg tart


Note for myself:
  • Great recipe, but try to make the crust thinner. Assuming that way, the crust will be crispier. But lovely crust! It gets removed easily.
  • I halved the recipe for both the crust and the filling. The filling fills up just right (nothing extra) making 8 egg tarts.
  • I baked at 170degC for 25min in my Fotile oven (mode: no fan on, but bottom and top heat on), but the filling was still wobbly. Baked for another 5min, and they come out looking a little brown on a few of the egg tarts. I would think maintain the temp and bake for a total of 28min, it should be okay. Note: this is only for my own reference. Different oven differs.
  • I reduced the sugar content of the filling by 10g. The sweetness was just right.
  • I would omit using vanilla essence or I would use real extract from vanilla bean pod. 
  • I used disposable aluminium foil tart pan. It's time I get some real tart pan for next bakes.
 
Hohohooo.. I quickly jot down these notes for my own referral so that I can make improvements for my next egg tart bake, which I believe will be very soon. This is a superb recipe. The crust tastes great, with just the right sweetness and butter in it. The filling is good too! I must thank Mui Mui from My Little Favorite DIY for sharing this. She calls this her perfect egg tart. Since it's my first attempt, I wouldn't know which recipe to start with, so I trusted her and attempted her 'perfect' egg tart. It doesn't disappoint me. If you haven't had any favorite recipe for egg tart yet, this is a good one to start with.
 
Both recipes are by Mui Mui from My Little Favorite DIY, adapted from Wendy from Table for 2.
 
Recipe for egg tart pastry
 
Ingredients:
  • 250g unsalted butter, at room temperature  
  • 1 egg
  • 2tbsp castor sugar (I used brown sugar)
  • 400g all purpose flour
  • I added a pinch of salt
Instructions:
  1. In a mixing bowl, beat butter with sugar until fluffy. Add in egg. Mix. Add in flour till it resembles texture of coarse crumb. Prepare a large sheet of cling film. Pour the crumbly dough onto the cling film and bring together to a lump. Let rest for 15 minutes in the fridge.
  2. If the dough has become too hard from sitting in the fridge. Warm it up just slightly with the warmth of your palm. Roll dough to about 4mm thickness. Cut with a 7cm round pastry cutter (I just used my rice bowl which measures 7cm diameter). Place round dough disks into egg tart tins (I used disposable aluminum foil tin).
  3. Refrigerate the lined tart tins till they are very firm, for at least 2 hours. (I did mine the night before, and left in the refrigerator, with the whole tray wrapped up in a plastic bag).
Recipe for egg tart filling
 
Ingredients
  • 150g sugar (I used brown sugar)
  • 150ml hot water
  • 250ml fresh full fat milk
  • 1/8 tsp salt
  • 1/2 tsp vanilla extract
  • 3 large eggs and 1 egg white
Instructions
  1. Dissolve sugar in hot water. Chill.
  2. Combine sugar syrup, salt, vanilla extract. Beat eggs lightly (try not to incorporate air) and combine all.
  3. Sieve egg mixture and pour into a pitcher (for easy pouring), then fill up tart case with egg mixture.
  4. Bake in a preheated oven at 170degC for 28 minutes.
Half of this recipe made 8 egg tarts.


Spaghetti stir fry with pumpkin and fish 南瓜炒意粉


To be more exact, this is a Fettuccine stir fry, cos it was Fettuccine that I used, not spaghetti. This is a quick and easy breakfast cum lunch prepared for the lil' one. The Fettuccine was boiled the day before and stored in the fridge. In the morning, I just soak it in hot water for about 5 min before stir-frying it. I only got little time for a quick and easy recipe this morning, cos I was also making egg tart for our breakfast. See this post for the egg tart's recipe.
 
Fettuccine or spaghetti are great for stir-fry, and especially if you are like me, keeping it warm in the thermal for the little one's consumption later on, unlike some noodles, fettuccine or spaghetti doesn't get soggy easily. It still maintain its bite even after a few hours sitting in the thermal container. Here's the recipe for this Fettuccine stir fry. Bon Appetit!

Ingredients:
  • 2 cups of cooked fettuccine (or any pasta of your choice)
  • about 200g pumpkin, julienned  
  • 1 clove garlic, minced
  • 1/2 onion, thinly sliced
  • 1 piece of threadfin fillet (thinly sliced) and marinated with Bragg's Liquid Amino, toasted sesame oil and black pepper powder
  • 1/2 cup water + seasoning (optional), I added 1/2 tbsp. Bragg's Liquid Amino
  • 1 egg, beaten with 1tbsp milk

Instructions
  1. Heat up the fry pan with 1tbsp grapeseed oil.
  2. Pour in beaten egg mix and cook on low-medium heat until one side is cooked. When the upper side is cooked, roll up and remove from fry pan. Thinly slice and set aside.
  3. Add a little oil to the fry pan and heat up. Stir in minced garlic and onion, followed by pumpkin julienne. Cook until garlic and onion turns soft and fragrant. Add in fish fillet.
  4. When fish is cooked through, add in cooked fettuccine. Stir fry for about 1-2 minutes.
  5. Add in water and seasoning. Put on the lid and let the noodle simmer for another 3 minutes (this stage is optional. I do this because I want the fettuccine is softer, easier for consumption by my 19mo).
  6. When the liquid has been absorbed, remove fettuccine stir fry from pan and serve with sliced omelet.


Hello there! This is my jolly lil' fella, enjoying the Fettucine stir-fry.

Thursday, June 19, 2014

Pasta with creamy broccoli sauce/ soup


The lil' fella had been refusing to eat his broccoli lately! To avoid him wasting the remaining broccoli I have in the fridge, I decided to turn them into pasta sauce. Any kid that refuses vege wouldn't know this super creamy and yummy pasta sauce has veg in it.

Ingredients (this makes about 3 baby's meal portion)
  • 1 stalk of broccoli, cleaned and cut into florets
  • 2 small size potato, peeled and cut into cubes
  • 1 cup of water or vegetable stock or 1/2 water 1/2 milk
  • 1 clove garlic, minced
  • 1/4 onion, minced
  • 1tbsp butter
Instructions

In a pot of boiling water, cook cubed potato and cut broccoli till soft (about 5min). Drain off and set aside.

Heat up a soup pot, or fry pan. Add in the butter. When it starts to sizzle, stir in the minced garlic and onion. When the garlic and onion are brown and fragrant, add in boiled potato and broccoli. Saute for another 1-2 minute.

Add in water/ stock. Simmer for another 5 minutes.

Bring the mix to a blender and blend until creamy and smooth.

Serve with cooked pasta or serve as soup.

He told me he was going to board the airplane and waved me 'bye'.

This post is linked to the event Little Thumbs Up (June 2014 Event: Butter) organised by Zoe (Bake for Happy Kids) and Mui Mui (My Little Favourite DIY) and hosted by Jozelyn Ng (Spice Up My Kitchen)

Orgran vanilla cupcake (Gluten free)


This is another beautiful gluten free and wheat free product by Orgran. I have tried out their apple and cinnamon pancake last week. I was very impressed by the turnout. For this vanilla cake mix, instead of baking it as a 8-inch cake, I baked them as cupcakes. Again, they are very easy to prepare, it only required butter (or oil), water and egg. For vegan, you can opt out the egg. The batter was quite runny compared to the other cupcake batter I have made, but they turned out soft and fluffy. The texture was still good, and the flavor was better the next day, when eaten cold.
 
One pack makes about 10-12 cupcakes, you may also add in raisins, chopped cranberries or chopped fig into your cupcakes. I had about a teaspoon of peanut butter added into each of the cupcake. I filled the cupcake to about 75% full and they raised till the brim upon baking.
 
Ingredients (as per packaging)
  • 165ml water
  • 2 eggs, lightly beaten
  • 60g butter (at room temperature) or 2tbsp vegetable oil
  • 1 pack of Orgran vanilla cake mix
Instructions as per packaging:
  1. Add contents of Orgran vanilla cake mix to 165ml water, 2 eggs (lightly beaten) and butter.
  2. With electric mixer (I didn't use an electric mixer, I just used a folk), mix on low speed till evenly combined.
  3. Pour batter into cupcake liner.
  4. Bake in preheated oven at 170degC for about 20-25min or until an inserted toothpick comes out clean.


Wednesday, June 18, 2014

Oat noodles with tofu and mushroom in miso sauce


This is my lil' fella's lunch. I also prep extra that served as breakfast for me, him and hubby. I talked about miso a couple of months back in this post, when I first introduced miso to my lil' fella, when he had bouts of diarrhea and hasn't got appetite to eat much of his food. Since then I have been cooking with miso a lot, for the baby and for the adults.

Here's the info I copied from my previous post on miso:

Miso paste is an Asian seasoning made by fermenting a mixture of soybeans, barley, brown rice and several other grains with koji or also known as Aspergillus oryzae. The result of this fermentation is a smooth-textured paste with a strong savory flavor. Often used in Japanese cooking, miso is a healthy, probiotic food that helps support digestion by adding beneficial microorganisms to your digestive tract.
 
According to the Harvard School of Public Health, consuming miso rich in probiotics can shorten the duration of infectious diarrhea, especially in infants and children. (Here's the reason why I served him miso when he had his bouts of diarrhea, info from here). Just like the other fermented food eg cheese, yogurt or tempeh, the array of nutrients are very wide in miso. Due to the diarrhea, it would be normal to assume that he has lost a lot of liquid and nutrients from his body, therefore feeding him miso was a good way to replenish back the good nutrients. Nutritionally, miso provides mostly carbohydrate with some protein. It is also rich in several of the B-complex vitamins and contains several minerals, including calcium, iron, zinc, copper and magnesium.
 
Other than its beneficial effects onto our digestive tract, it is also known to protect against radiation exposure. After the atomic bomb in Nagasaki, Japan, Dr. Akizuki fed his patients a diet rich in sea vegetables and miso, limiting their consumption of sweets and sugar. The patients at Dr. Akizuki’s hospital were only one mile from the bombsite, but everyone survived. Many people outside the hospital perished due to radiation exposure. This piece of info was gathered from here.
 
Miso paste can be used to prepare broth for noodles or porridge. It has naturally occurring sodium, so there is no need to add salt into the broth. Miso can be gradually introduced to the little ones after turn. I have started introducing miso to my lil' fella at 16mo. The following recipe has no meat. You may want to add in minced or cubed chicken into the dish while cooking.
 
Ingredients (This recipe makes 2 babies' meal, and 2 adults' breakfast)
  • 2 bundle of oat noodle, cooked in boiling water till soft
  • 2 cloves garlic, minced
  • Half an onion, minced
  • 3-4 fresh brown button mushroom, cleaned and chopped
  • 2 soft white tofu, cut into cubes
  • 1 small stalk of broccoli, blanched in boiling water for 2min and then chopped
  • 1tbsp mugi miso (depending on types of miso, some miso tastes saltier)
  • 1/2 tbsp. liquid amino (by Bragg) (that serves as a salt-free alternative to soy sauce)
  • 1cup water (a little warm-ish)
  • 1/2 tbsp. corn flour with 1/2 cup water (optional)
Instructions
  1. In a pot of boiling water, cook the oat noodles till soft. Blanch the broccoli for 2 minutes and chop into little pieces (this is more for the baby. If you're making this for adult, you may opt out the chopping).
  2. Dissolve the mugi miso in the water (a little warm-ish) - this is the stock.
  3. Heat up a shallow fry pan with 1tbsp grapeseed oil, stir in the minced garlic, onion, followed by chopped mushroom, tofu and broccoli. When they turn slightly brown, pour in the miso stock and the liquid amino, and let the dish stew for about 5 minutes.
  4. Dissolve corn flour in water, pour into the stew. Let boil for 1 minute and serve with cooked noodle.
This is Bragg's Liquid Amino I've been using when cooking at home, it's a salt-free alternatives to soy sauce. Despite of the fact that it's salt free, it still tastes good. It contains naturally occurring sodium, so only introduce it to the little ones after they have turned one or 15month old. It's available for sale at Just Health or any organic or health shops.


Tuesday, June 17, 2014

Best banana muffin

I'm always looking for an easy but GOOD recipes for banana muffins. This time I simply googled for soft and moist banana muffin, and this is what I found, a simple recipe for some awesome banana muffins.
 
It's super easy. Check out the ingredients. You would probably have over half of the ingredients somewhere in your kitchen now.  I don't have enough butter lying in my fridge, so I just replaced the butter with grapeseed oil. I also used half a cup of 10-grain oat flour replacing the white plain flour. But the texture of my muffins still turned out great. I had lots of leftover walnut streusel topping from my previous bake (walnut streusel coffee cupcake), so I use them as a pretty topping for these banana muffins.


Recipe
  • 3 or 4 large ripe banana, mashed
  • 1/3 cup brown sugar (original recipe called for 1 cup, then reduced to 1/2 cup by catcancook)
  • 1 egg, beaten
  • 1/3 cup melted butter (I used 1/3 cup grapeseed oil)
  • 1tsp baking soda (I would replace this with baking powder next bake. I don't like its taste)
  • 1tsp baking powder
  • 1/2 tsp salt
  • 1cup all purpose flour + 1/2 cup 10-grain oat flour (or 1.5 cup all purpose flour)
Combine the mashed banana, sugar, egg and oil. Set aside.

In a separate bowl, mix together baking soda, baking powder, salt and flour. Combine wet and dry ingredients.

Pour into muffin liner. Bake at 165degC for approximately 18-20minutes.


Monday, June 16, 2014

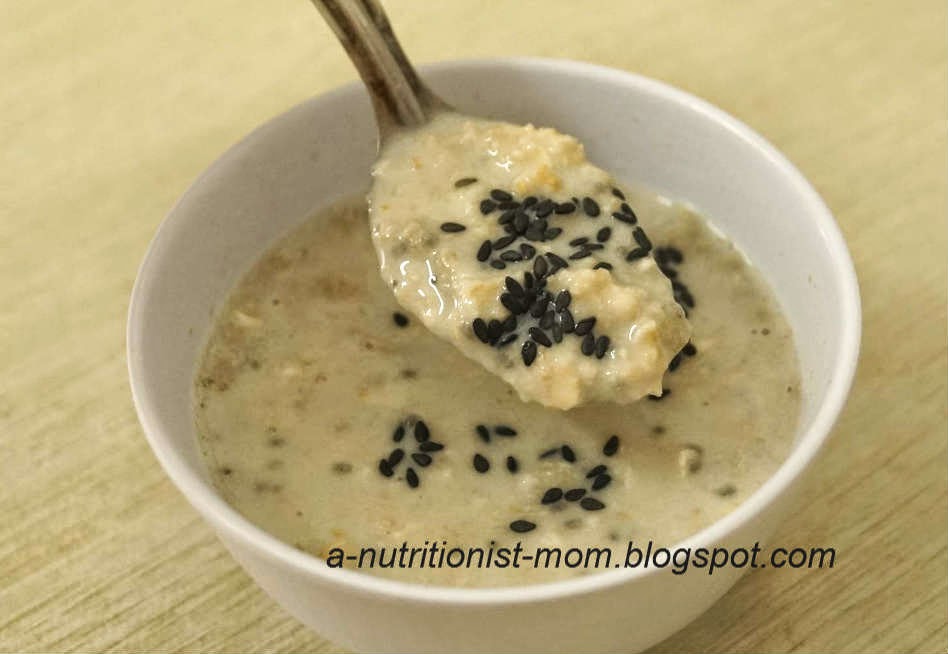
Quick no-soak black soy oatmeal

My buddy Kelly asked me if I can snap a photo of all the food me and my lil' fella eats and then send to her, she wants to follow and eats healthier. Sometimes I do wonder. Do I really eats healthier than the others? Oh well.. but I do control on my snacks intake. These days, all bread and cakes are mostly home-baked. I have cut down on munching on crisps. We try not to have them appearing at home, cos I don't want my lil' fella to be munching on them. We snack on yogurt (plain yogurt with fresh fruits) or homebaked muffins or cakes. This recipe I'm sharing is something I can easily prepare in less than 5 minutes. I usually have it when I get hungry at this hour (it's now 4:37pm) with about 3 hours before dinner time. The best thing about this quick no-soak oatmeal, if one bowl isn't enough to fill me up, I can have another bowl. The guilt-sensation of it is almost zero!


You'll need
  • a small bowl or a mug
  • 3tbsp rolled oat
  • 2-3tbsp black soymilk powder
  • half a cup of hot water
  • black sesame seeds
This is a nice healthy snack that is great as breakfast or a late night supper too. It's high in dietary fiber, great for those with or without constipation. Why black soy? Black soy is bursting with iron, great pick-me-up nutrients especially for the ladies.


Sweet potato salad with sweetcorn and cream cheese sauce


Does salad mean 'low fat' to you? Haha! Then I'm here to tell you, not necessarily! Here's a very easy Sunday salad lunch I prepped for my son. I love my Sunday very much. We get to sleep in and wakes at 8am (instead of 6am, cos I need to prep his lunch during the weekdays to be brought over to the nanny's), and best of all, I get to spend at least 3 to 5 hours watching Korean or Taiwanese drama (yeah!! Korean drama marathon! doesn't that sound superb!?) I have been watching the Korean drama 'The Inheritors' starred by the very famous Lee Min Ho. I find that Korean dramas are quite 'dramatic' and out of reality and my hubby would say 101 negative critiques about these drama. But I just like using zero brain cells watching them, so chillaxing!
 
To prepare this salad as a brunch or supper, or your baby's main meal, you'll need
*Half a medium size sweet potato, steam-cooked
*1tbsp sweet corn, steam-cooked
*1 hard boiled egg
 
The sauce is prepared by mashing
*2tbsp cream cheese (warmed up by microwaving for about 20sec in microwave) with
*1tbsp basil olive oil (or any olive oil)
 
Seasoning (optional)
*Pinch of salt
*Cracked black pepper


Walnut streusel coffee cupcake

It's called a coffee cake, but it hasn't got coffee in it. Silly me! I thought coffee cake consists of coffee essence or coffee powder in it. According to google, coffee cake a cake or sweet bread flavored with cinnamon or topped or filled with cinnamon sugar, eaten usually with coffee. Ah.. don't I learn something new everyday?
 
I learnt of this walnut streusel coffee cake (originally pecan streusel coffee cake) from Mich from piece of cake. It's a recipe from the book Coffee Cakes: Simple, Sweet and Savory by Lou Seibert Pappas. Pecans are not just expensive but also rarely available in where I am. So I just replace it with walnut, but I can imagine how heavenly it will be with pecans. Even without it, it's already good, oh! I also added mashed banana into the cupcakes. Three of us, ie my sis in law, my son and I enjoyed it while we laze on the couch watching tele on a relaxing and slothful Saturday afternoon. Okay, correction, my son don't sloth, he was basically busy playing and roaming around the house, while both of us lazed on the couch.
 
I halved this recipe and baked them in cupcakes, and topped with the very delicious walnut streusel topping. From Mich's blog, there were about 30 comments from her post of this cake, and majority were commenting how nice the cakes were. I knew I had to bake it and needless to say, I knew they would be good.


Here's the original recipe (by Lou Siebert Papas) from Mich's Piece of Cake
(I halved the recipe and baked about 5cupcakes with it, with lots of leftover streusel topping)
 
Streusel Topping
  • 4tbsp cold butter, grated
  • 1/3 cup all purpose flour
  • 1/2 cup brown sugar
  • 1tsp cinnamon powder
  • 1cup walnut, chopped
 
Cupcakes
  • 4tbsp butter, at room temperature
  • 1/2 cup brown sugar
  • 1/2 cup granulated sugar (I omitted this)
  • 2 large eggs
  • 1tsp vanilla (I omitted this)
  • 2cups all purpose flour
  • 1tsp baking powder
  • 1tsp baking soda (In my halved recipe, I omitted this but replaced with baking powder)
  • 1/4 tsp salt
  • 1cup buttermilk or low fat plain yogurt (I replaced with full fat fresh milk)
Instructions
 
Preheat oven to 165degC.
 
Make streusel topping by combining butter, flour, brown sugar and cinnamon in a bowl, until the mixture resembles coarse crumbs. Stir in walnuts and set aside.
 
In another bowl, cream the butter and sugar with a mixer until light and fluffy. Add in egg and beat until smooth.
 
In another bowl, combine flour, baking powder and salt. Add to the creamed butter mixture alternately with the milk in two separate portions. Beat until smooth.
 
Fill the cupcake liner with the batter till about 60% full and sprinkle with topping (till about 75% full).
 
Bake for 20min or until a toothpick inserted in the centre comes out clean.  


I'm linking this post to the event, Little Thumbs Up with the theme 'BUTTER' organised by Zoe of Bake for Happy Kids and Doreen of My Little Favourite DIY and hosted by Jozelyn Ng of Spice Up My Kitchen.


Juchheim’s baumkuchen (tree cake)


My cuzz 堂嫂 just got back from her shopping spree in Singapore and got us a real treat, a Juchheim cake!! I was soooo delighted to see it. I have not tried it before but have always seen it or read about it in magazine. Now what is it? It has quite a story behind it. You can read more about it at http://juchheim.co.jp/). In simple words, it's a German traditional cake (Baumkuchen, also known as king of cakes) being brought to Japan by a German and re-produced and sold in Japan. It dated back to 1909 (over 105 years!!). With over hundred years of history, you would think it's now massly sold across the globe, no, it's not. It's only sold in Japan, Singapore, China (Shanghai and Hong Kong).

I tried to figure out how they make it. It looks like swiss roll (and tastes like swiss roll too, but with much thinner and more layers) but manually, how is it possible to bake and roll something so thin? Nah.. I was wrong. I read about it. Apparently, in the shops/ cafes where they are sold, you'll get to see how they are made. The skillful confectioner scoops and brushes the batter evenly on a thick wooden bar, that is reeled by a motorised machine round and round and round and the cake is then baked on the bar. Traditionally, the baumkuchen was baked over an oak spit (baumkuchen literally means tree cake in German), and it was a painstaking and time consuming process making it, cos the oat spit (bar) was manually rotated by hand.
 
It's amazing how just few simple ingredients (ie egg, sugar, flour and very little butter) makes such an exquisite cake. Somehow the story sells too!
 
Is it good? It tastes like swiss roll to me, but drier. Cos it has very little amount of oil it and without the cream in between. Some says it resembles Indonesian Kueh Lapis (layer cake) but that is much oilier. I like it with a mug of tea or coffee. I like it cos it is not too overpowering in terms of its sweetness or creaminess. I can have quite a few pieces at one go. In Singapore, its price starts from SGD 9.90, depending on size.


Pasta with crispy breaded fish fillet


At 19month old, the lil' fella isn't the perfect eater everyone thinks he is. Hahahaa... he has always been portrayed or perceived as the ideal baby food connoisseur. I don't have problem of feeding him. He loves his food. Thank God almighty. But there are certain texture  or food that he is not fond of and he'll not force them through his throat. For instance, he doesn't fancy ice cream, but the cone. He eats pau, but just the skin, not the filling, even if its sweet creamy pandan paste filling nor nice savory char siu pork. He loves my bread, but not with jam. He loves them plain. The most important note I want to remember for ever, now, he still prefers my cooking than any other food he eats outside! (despite that the meals I cooked are much lighter in terms of flavoring, salt nor oil) Hooray! I know this will not last forever, so even if it's just for a short while of time, I am still happy.
 
This is a simple but a little fancy lunch I prepared for him. I have not done anything breaded or crispy ever since I left Padley's working as a Food Tech. During my internship year in the UK, I used to work as a Food Technologist working on recipes for McDonald's. So I was working in the test kitchen and roaming through the poultry factory EVERYDAY! I don't miss those early morning hours test-running new recipes in the factory. So cold! Brrrr!! But I definitely appreciate the 'breading' skills I learnt from there. There wasn't a need to refer to any recipe. My hands just knew what I needed to do to make this.
 
So, here's the recipe for a simple crispy breaded fish fillet (or chicken fillet)
*1 egg, beaten
*1/2 cup all purpose flour
*1/2 cup bread crumb (made from 2 days old bread, toasted and blended to fine powder) mixed with 1/2 tbsp. black sesame
*few white fish fillet (I used threadfin), thinly sliced
*Dash of liquid amino (Bragg's) as seasoning or pinch of salt with black pepper powder
*Dash of toasted sesame oil
*1-2 tbsp. grapeseed oil or rice bran oil (for frying the breaded fish fillet)
  
Beat the egg with 1tbsp water in a bowl. Place the all purpose flour and bread crumb in two separate plate.
 
Marinate the fish fillets with liquid amino, black pepper and toasted sesame oil.
 
Dredge the sliced fillets in flour, coating both side with flour. Shake off the excess flour, then dip in beaten egg, drip off excess eggy liquid, then place them in the bread crumbs. Gently press crumbs onto both sides of fish, coating them completely.
 
Preheat a frying pan. Add oil and heat until hot. Fry the fillet for about 2min on each side (depending on thickness) until golden brown.
 
Serve with cooked pasta, drizzled with basil oil.
 
You may prepare tomato-pumpkin sauce to go with it.


Friday, June 13, 2014

Apple and cinnamon pancake (Gluten free)

Pancakes and I don't  go along. I have failed many pancakes. I have had batter that sticked to the pan or pancakes that tear apart when flipped. There was once I had to bake the pancake in a cupcake liner cos I was sick of trying it on my pan. Needless to say, it didn't turn out good.
 
I'm trying to make pancakes again! And this time I'm using a gluten free apple and cinnamon pancake mix by Orgran. I don't have good feeling about it as it is not only gluten free, it's also free from wheat, dairy, egg, yeast, soy, nut and no added cane sugar. This pancake mix is perfect for babies under one! But for adults, I was doubtful. Guess what? I was wrong! They turned out good! They were fluffy with good bites. The sweetness (from fruit sugar and from the real apple chunks in it) was just right. Love the cinnamon in it. Best of all, I made some beautiful pancakes with it!! My first beautiful pancakes that deserved to be photographed!!
 
Both the lil' fella and I enjoyed the pancake for breakfast this morning drizzled with honey, served with banana and orange yogurt (which was basically just chopped up banana and orange segments with plain greek yogurt).
 
This is a very easy and convenient pancake mix. You don't even need to add in egg if you don't want to (that's why I mentioned this pancake mix is perfect as snacks for babies under one). All you need is just water or milk, and a frying pan.


Instructions as per the packaging:
  1. Pour contents into a bowl and add 400ml of water or milk and 2 eggs, lightly beaten (for egg-free version, add 450ml of water or milk instead), stir all ingredients into a smooth batter.
  2. Heat up fry pan. Place in about 1tbsp of oil (I used grapeseed oil).
  3. Pour about 1 heaped tablespoon of batter into fry pan and cook over low-medium heat. When the edge of the pancake appears cooked and bubbles are visually seen, turn over and cook the other side until golden brown.
Serving suggestions:
Serve with fruit yogurt, honey, or ice cream.

I had left over and stored them in the fridge. In the afternoon, I wrapped them up in foil and reheated in a preheated oven for about 5min and they were still good.

Orgran Gluten Free Apple and Cinnamon Pancake Mix is now available for sale at Just Health. For info, please call 089 210 620 or email justhealthsandakan@gmail.com

Disclaimer: Product provided. No compensation received. The honest opinions are my own.

Thursday, June 12, 2014

Homemade garlic bread

It's really nice I finally get to prepare just the one breakfast and it gets to be shared among all of us, including the lil' fella now at 19month old (I used to prepare two or three types of breakfast cos the lil' fella cant eat adult's food yet). This morning, I prepared this, made myself a great cuppa and we sat down near the tele allowing me to catch up on the AOD drama playback.
 
These days, I still have flash backs of those times when he was still little, I barely get time for getting myself ready, let alone eating breakfast. The whole morning was spent holding him, soothing him, getting him ready to go to the nanny's etc... I still get phobia thinking of those time. That's why nowadays I appreciate it very much that I get to enjoy my breakfast with him while having a short while of fun prior to leaving the house.
 
This is a very easy to prepare garlic bread recipe. You can use any bread or bun you have at home, it can be a day or two days old bun. Once oven-baked, it will turn soft again. The bun I used was the rye bun recipe shared here. I added in black sesame seeds (about 2tbsp) into the dough while kneading, and instead of walnuts, I used dried black apricot.

Slice the bun to about 1cm or 1.5cm thickness, brush the garlic butter (for recipe, see below) on each sides of the slices. Then assemble the slices back to its original form. Wrap with aluminium foil or parchment paper. Preheat the oven to 180deg C, bake for about 10min. Enjoy! If there are remaining garlic spread after spread on the bread slices, brush the balance spread on top of bun.


Recipe (garlic butter spread enough for 1 bun)
  • 1 small clove of garlic, minced with pinch of salt*
  • Pinch of salt and cracked black pepper
  • 1tbsp butter, melted
  • 1tbsp olive oil
*Mince the garlic with a pinch of salt, this way, it gets minced and turns into a paste easier and faster.


I'm linking this post to the event, Little Thumbs Up organised by Zoe of Bake for Happy Kids and Doreen of My Little Favourite DIY and hosted by Jozelyn Ng of Spice Up My Kitchen.
Related Posts Plugin for WordPress, Blogger...