Wednesday, March 18, 2015

A toddler's Zha Jiang noodle 一个幼童的炸酱面


'Mien mien is black in color', he told me when he saw this. Deep down inside, I was nervous, but I hid my wrecking nerves, cos I wasn't sure if he would accept it, I have heard many kids who doesn't accept non-ordinary-looking color noodles or pasta. I took the risk today in making this black charcoal noodle topped with zha jiang (minced chicken with finely chopped pumpkin and apple in organic fermented red yeast bean curd sauce 有机红曲豆腐乳酱)。 Yummm.. I uttered out while slurping the noodle. He then said, mien mien hou sik (the noodle is delicious). Tada!! I was a happy mom he loved this! 

Today's theme for his tot schools is bat, inspired from the CVC words that he's learning this week, ie Bat, Cat and Hat. Even his meals today are inspired by today's theme, black color charcoal noodle that resembles the color of bat. Pumpkin and apple are bat's food. 

I personally love zha jiang mian a lot, I love to have lots of the zha jiang that gives flavor to the noodle, but I don't know what flavoring or sauces are used to cook those sold outside. I am just trying my luck with this organic  fermented red yeast bean curd sauce, it turns out to taste very yummy. 


Recipe (serves 2-3)
  • 1/4 or 1/2 chicken breast, minced, marinated with pinch of salt, toasted sesame oil and 1/2 tbsp cornflour 
  • 2tbsp cooking oil, I used organic grapeseed oil
  • 3 cloves garlic, minced 
  • 150g finely cubed pumpkin 
  • 1/2 apple, finely cubed 
  • 1/2 tbsp fermented red yeast bean curd sauce, dissolved in 3tbsp hot water 
  • pinch of salt and white pepper powder (optional) 
  • noodle, boiled to bring to cook 
Instructions 
  1. Heat up 2tbsp cooking oil in a hot frying pan. 
  2. Stir in minced garlic and minced chicken. Stir fry until chicken gets brown. Stir in cubed pumpkin and apple. Stir fry for another 2-3 minutes 
  3. Pour in fermented red yeast bean curd sauce, close the lid and simmer for another 5-10minutes, make sure the pan doesn't gets too dry, add in more water if needed. Season accordingly. The red yeast bean curd sauce itself is fermented, thus is quite salty. 
  4. Optional, thicken the sauce with cornflour if needed. 
  5. Serve with cooked noodle. 


**Organic fermented red yeast bean curd sauce 有机红曲豆腐乳酱 is available for sale at Just Health, Sandakan. Contact: justhealthsandakan@gmail.com 


Saturday, March 14, 2015

Tot School: Learning about B and Bus

I was very fortunate to be following mommy Bear Lim's blog and insta and got updated that she developed some materials for her girl. Coincidentally her girl is only a few months ahead of Josh so most of the program that she planned fits Josh pretty well. I downloaded this entire bus themed materials and Josh loves most of them, except the one to do with numbers, maybe because he's still not familiar with numbers yet. 

Materials are downloadable from here. So this few days, we are basically doing most of her worksheets, combined with some that I planned for his gross motor development (outdoor play) and science activities. Josh's tot school also includes baking. It wasn't my intention to include baking as part of his tot school activities, but because I got to bake to plan for my demo event coming Sunday, so I make it appropriate to involve him during the baking. 

These are some of the activities done for the past few days: 

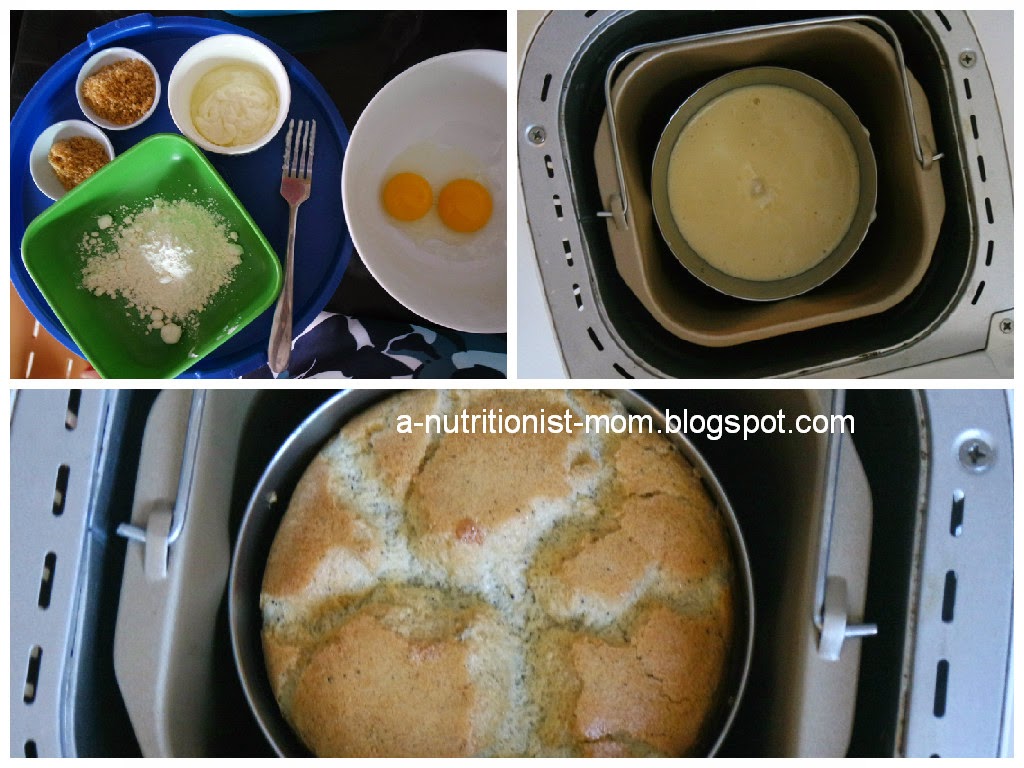
Bake session: Baked a mini chiffon cake using our Donlim breadmaker. He helped me pour in the sugar when I was combining the ingredients with a hand-mixer. 


Gross motor activity: Box bus 
Used a used box, sticked a 'bus' photo outside the bus, told him it was a bus and let him 'drive' (pull with a string) the bus along outside our house and let him 'pick-up' some passengers (his toys). I put in some heavy books into the box so that he'd use his core muscles for the 'pulling'. 


Bus theme activities: 

Coloring (with papa)

Do-a-dot for letter B and bus

Shape recognition

Science activities: Eye dropper and kitchen paper - Concept of hydration and dehydration 
This is a good one to educate on the importance of drinking more water. For Josh this managed to act as a constant reminder for him to drink more water. First I cut out two man / woman or boy and girl shape on a kitchen paper, then I made some colored solution (using his water color mixed with water) and let him use an eye dropper (pipette) to hydrate the kitchen paper men. Once he's done, I air dry the kitchen paper men for 24hours. The next day, I let him touch on the kitchen paper men and asked why has the men dried up? I continued, that's because the men has not been drinking water. The same will happen to you if you don't drink water. And there he goes, reaching out for his cup for more sips of water.  

I love letting him do science activities because (1) they are fun and secondly he would sit there focused on his activity for a pretty long time without closed supervision if it doesn't involve any dangerous or harmful objects. 


About ourselves: My face 
Under this topic, we have learnt about our face, and proceeded to building a face for Mr. Potato Head. Under his construction, Mr. Potato Head looks more like potato bird but I cant find no fault to that. 


Learning about numbers 
Since the school that he attends is more phonics orientated, he is still not familiar with numbers. So whenever the activities or worksheets are related to numbers, he doesn't seem to be interested. However, this busy bag material is the only one that gets his enthusiasm. He's been playing with this over and over, even during dinner time. The materials used, except for the popsicle sticks, the eye and the number stickers, are gifts from my cuzz from Hong Kong. 


Thursday, March 12, 2015

Breadmaker butter and milk oat loaf (Baking with little one)


Now that the little fella is about 2 years + we do a lot of stuffs together. Everyday at 5pm, I'd try to leave my shop earlier so we can have more time for some playtime or activities before we depart for our in-law's for dinner. Yesterday, we did a lot, other than the activities for Josh's tot school, we baked a very aromatic butter and milk loaf. This is the age that they want to be involved helping us with all kind of tasks, and cooking or baking is one of them. I felt that when he's involved in making the food, he eats more of them. This loaf took about 3 hours to bake, so it was already bed time by the time it was done. He was only able to see and taste it the next day and he loved it, he was picking out the pistachio to munch on. 

Baking this was quite simple, as it is a straight dough recipe which requires no advanced preparation of a starter dough or what not. All I needed to do was to weigh the ingredients and to put them into the breadmaker pan according to its order. The little fella helped me out in doing some parts of the ingredients input. He loved it and was checking out the dough with me when the breadmaker was doing the kneading. The loaf was made using my trusty Donlim breadmaker

Ingredients (placed into the breadmaker according to the following order): 
  • 80g whipping cream 
  • 150g cold milk 
  • 2tbsp rolled oat, organic 
  • 3tbsp brown sugar 
  • 1/2 tsp salt
  • 270g high protein flour (bread flour)
  • 30g all purpose flour 
  • 3/4 tbsp instant active dry yeast 

  • 30g butter, chopped into small little cubes (to be added in later, see instructions No. 5) 
  • 3tbsp pistachio (added in later, see instructions No. 6) 
Instructions

  1. Remove the breadpan from the breadmaker. Make sure the kneading blade is fitted in. 
  2. Add all the ingredients, except butter (in the order listed above) into the breadpan. 
  3. Insert and lock the breadpan into the breadmaker. 
  4. Select mode no. 1 (basic bread mode 标准面包),select WEIGHT重量as 900g, select CRUST INTENSITY烧色as LIGHT浅 and press START启动。
  5. The kneading blade will start to rotate to combine the ingredients to form a dough. About 5min after  kneading starts, lift up the lid, add in chopped butter and let breadmaker continues to knead. 
  6. Optional, I have also added in some pistachios, they were added in at about 20th minute.  


Wednesday, March 11, 2015

Chocolate hokkaido chiffon cupcake


This March is gonna be a very busy and packed month. Few days ago, my parents and sis were around in Sandakan to clear out our old house which we're ready to let go. It seemed impossible but we successfully cleared the house in a few days including majority of its furniture and electronics. Most of the items were discarded (sadly), some were transported to my place, out of those loots, I managed to complete my study room/ play area for the little fella, which I am very happy with. Balance of the items were given away free to friends. Now that my parents and sis have gone back to JB, I need to work my ass on the accounts of Just Health so I can submit to my accountant by the end of this month, and I still have an event to work on for this month, that event is happening in about 10 days and I still haven't done much about me. Arghhhhhh!! (Yes yes I am working on it now, while blogging). 

Despite all these, I am still cooking and baking for the little fella. I try my best to wake up at 6am every morning, so I have sufficient time to make him a snack and a lunch. 

This was something I have made two days back ~  very yummy chocolate hokkaido chiffon cupcakes which were our breakfast for two days. They kept very well in the fridge. On the third day, they are still edible, but they tend to be drier. 

It was a recipe adapted from my little favorite DIY, here. 

Ingredients A 
  • 60g grapeseed oil
  • 80g fresh milk
  • 85g superfine flour
  • 2tbsp cocoa powder 
  • 5 egg yolks 
  • 1tsp pure vanilla extract 
Ingredients B 
  • 5 egg white 
  • 80g brown sugar
Instructions: 
  1. Combine oil and milk in a bowl. Place over a double boiler and cook with low heat, stir well. (I zap the combo in microwave for 40secs) 
  2. Add egg yolk, mix with a whisk. Add in vanilla extract. 
  3. Sift in flour and cocoa powder. Combine till smooth. Do not overmix. 
  4. Using a hand electric mixer, whisk the egg white and add in sugar in three batches until stiff peak. 
  5. Add 1/3 of egg white meringue into the egg yolk batter. Combine well. Fold in the remaining egg white meringue into the egg yolk mixture. 
  6. Fill up 3/4 of the cupcake liner. Gently knock once or twice. Bake in preheat oven at 150degC for 23min. 
  7. I let the cupcake lie on its side on a metal rack when cooking. You may also knock the cupcake on table top once before setting aside to cool. (Apparently this is a must to prevent the cupcakes from shrinking, I didnt do this and my cupcakes did shrink a little). 


Tot School: Learning to count

Do you know what type of learner are you or your kid? 

Josh is a very "auditory" kind of learner. An auditory learner learn by listening to what others have to say and talking about what they are learning. They remember information by talking aloud and talk to themselves while learning something new. Josh's teacher at his playschool told me that he follows what everyone else says and repeats after them, now this include what teacher and the phonics video says, which explains the reason why he learnt those alphabets in such short time. 

There are three ways kids learn: auditory (by listening), visual (by seeing) and kinesthetic (hands-on experience). Most of them learn by a combination of these styles, but every kid is different and some can be more dominant in a certain style. Josh is quite dominantly an auditory learner. Understanding the types of learning styles will help a parent or teacher to enhance their method of teaching and learning may become easier for the kid. 

I have a feeling that an auditory learner will not love his figures and maths. I am not too sure. Correct me if I am wrong. Knowing that he's an auditory learner, I let him learn his counting the way he does best - by reciting out loud. 

This is a simple bean counting task based on the number shown on the paper cup. First, I ask if he recognize the number on the cup. If he does, I let him place the exact number into the paper cup one by one. If he doesn't, I will let him know and will show him how I transfer the number of beans that goes into the paper cup one by one. 


Tot School: Learning about science ~ ice sensory play, melting and coloring activity

Again, here's another activity for the little fella, as inspired by mommy Bear Lim. 

This is a very good one, as it involves training on his fine motor skills using the eye dropper, this also teaches him on the concept of hot (water) and cold (ice) and finally melting. Most important of all, this is fun. After this, he has been talking about it, and claiming that he wanted to do this again the next day. It was interesting to know that a simple task like using an eye dropper to squeeze up liquid color and to transfer them to another spot isn't an easy task for a little toddler. It took him a few rounds before he got the hang of it. Activities like this are good to maintain his attention for at least 20 minutes. 

According to littlebinsforlittlehands.com, activities related to eye dropper are great for fine motor skills developement: 
  • Eye droppers are awesome for isolating the fingers used for writing 
  • Eye droppers are awesome for strengthening hand muscles 
  • Eye droppers are awesome for practicing coordination, control and patience, all important for handwriting! 
Now, where did I get my eye dropper? It was one that I recycled from a finished-up skin care. You can probably get them from a pharmacy or online shops selling educational tools for young kids. 

Once he was done with the coloring, I gave him a jug of hot water and told him to be very careful with it 'cause it's very hhhhoooootttt and let him pour onto the ice and let him observed them melt. 

Aside than the hot, cold and melting concept that he's exposed to in this activity, he was also very amused with the way one color turned into another color when mixed, he kept on asking, 'yiii.. why is there brown color?'. I felt that it was too much for him to absorb in one day, so I may let him learn about this in another day again. 


Tuesday, March 10, 2015

Terrace house for sale (Sandakan)

My parents are ready to let go of their feng shui house in Taman Sentosa, Sandakan, Mile 2.5. Now why do they call our house a 'feng shui' house, apparently many had commented that this house brings good luck especially for those with family and kids, because 4 UK graduates are brought up here in this house. Haha.. pardon me if this sounds a little "cheesy" but that's what other people says anyway. We are Christians and we don't really study feng shui to that extent to comment much. 

So here are some of the details and photos of this double-storey terrace house: 

  • Land size: 2040 sqft 
  • Built up approx 24" x 73" 
  • 3+1 rooms & 3 bathrooms 
    • 1 master bedroom with attached bathroom (upstair)
    • 2 bedrooms (upstair)
    • 1 dining room / study room (downstair) 
  • Dry and wet kitchen (extended) 
  • Very spacious living area 
  • Front porch and back garden 
  • Asking price RM400,000 
To view, please kindly call me Jennifer Lee 012 324 1816 and viewing can only be arranged on Sunday with prior appointment. 

Living area 1

Living area 2 / TV room 

Master bedroom (with attached bathroom)

Bedroom 2

Bedroom 3
Dining room/ Study room

Bathroom (Main)

Attached bathroom 
Dry kitchen

Wet kitchen (extended)
Back garden


Car porch

 Front entrance


Related Posts Plugin for WordPress, Blogger...